Current goings-on
I haven’t posted any bloggy things in a while, and I know folks start to worry if I haven’t posted in a while. So,
Rambles that are fluffy, by fluffy
I haven’t posted any bloggy things in a while, and I know folks start to worry if I haven’t posted in a while. So,
I’ve finally gotten a handle on my resin printer and have gotten some successful prints! Here’s some of what I did to get it to a good state:
So far I haven’t gotten a fully-successful resin print, but I’m inching closer and closer.
The current issue I keep running into is that it’s very difficult to separate a print from the bed, and I think I need to give up on having a good clean bed-adhered surface. It’s better to give all prints lift and support, probably, even if that means having more tiny surface defects on the side facing the build plate (which is better than having an entire shattered print when I inevitably resort to a hammer to separate it).
I also ran into a problem where somehow a bit of resin got underneath my FEP film (hopefully due to my own carelessness and not due to a leak I haven’t found on my vat!) and some resin got caked to the LCD. Fortunately, Phrozen’s suggestion of soaking it in 91% IPA and then using the plastic scraper to get it off worked just fine.
Anyway. For now I’m still stuck trying to sun-cure my prints, but hopefully I can figure out a decent cheap curing station setup. I’m thinking of building a curing box using UV LED strips but it’s so hard to find reliable parts for that sort of thing. I also ordered a cheap curing station off Amazon but I’m not expecting great results from it.
In the meantime, my FDM printer is working again, and now that I have a decent supply of isopropyl alcohol I can actually get prints to stick to the build plate!
I haven’t even put printer #3 through its paces yet, and I’ve just bought printer #4. Fortunately it’ll be a while before it gets here, and also I’ve been wanting a ceramic printer for even longer than I’ve been wanting a resin printer.
But, jeeze.
Anyway I both bought the printer and an extra bed, and also an extra extruder assembly with the notion of possibly converting a larger-format printer into ceramic printing. Or food printing, which this is apparently usable for too!
I’ve been on guanfacine for a few days and so far I’m not noticing that my focus has changed any, but on the plus side my blood pressure is great now. So, that’s good.
I don’t know if it’s from the naltrexone or the guanfacine but my dreams have been pretty vivid and weird, but usually in a good way. Unlike when I was on the Wellbutrin and my dreams were vivid and stressful.
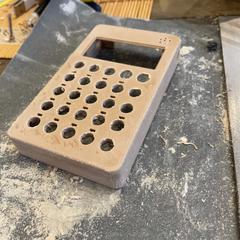
A week ago I bought some wood-filled PLA, and I’ve been experimenting with it a bit to see how to make it actually look like wood.
The first thing I printed (a Pocket Operator case) just looked like it was printed with boring beige filament, even after being sanded:

A few days ago my Palette 2S arrived, and I’ve been having some amount of fun with it. I won’t do a full review of it (there are plenty of those on YouTube, after all) but I’d like to talk about some of the things I’ve learned and how I have it set up.
I need to remember to look at the good stuff that’s going on right now, so here’s some good things.1
So, my main reason for wanting to get a Canvas Hub was to have easy one-click print support that works with the Palette; after playing with Slic3r a bunch last night I then realized I also wanted OctoPrint for its print queue functionality to decouple the print process from Slic3r (which turns out to be rather unstable at times, at least on the Mac). But it turns out that Palette’s OctoPrint plugins work with plain ol' OctoPrint, too. So I looked into building an OctoPrint node… and then realized I was overcomplicating things, since OctoPrint doesn’t actually need dedicated hardware1 — it just needs to be on a computer that’s physically close to the printer and has multiple USB ports available.
My desktop computer is physically close to the printer and has multiple USB ports available.
So I looked to see if OctoPrint runs on macOS, and yes, it does; there’s nothing Linux- or ARM-specific about it, as it’s all written in Python. The macOS-specific guide is an okay starting point, but I saw a few things that could be a bit simpler, so here’s what I settled on.
(Also note that these directions should also work for Linux and even Windows users! There’s no reason to build an OctoPrint hardware node if you already have a computer that lives nearby your printer!)