Home-brewed root beer

Comments

Base recipe for 1 liter of root beer: half a tablespoon of root beer extract (I use Zatarain’s) and half a cup of sugar (raw/turbinado sugar is especially nice).

For typical root beer, make half a cup of simple syrup by combining the sugar with half a cup of water and heating until the sugar is dissolved, then add it and the extract to 750mL of sparkling water.

However, for home-brewed root beer, which has a more complex flavor (and a slight amount of alcohol), combine the sugar, extract, 1 liter of water, and 1 teaspoon of yeast (baker’s yeast is fine, champagne yeast is better) into a clean 1-liter plastic bottle. Squeeze the air out and cap, and allow to sit at room temperature until the bottle has expanded and become firm to the touch, and then move it into your refrigerator to chill. This process depends on the temperature, and can be sped up or better controlled using a sous vide circulator set to around 90°F which should make the fermentation take only a few hours.

NOTE: Be absolutely careful not to let this stay out past the time it has gotten firm, or else you run the risk of the bottle exploding and making a mess! And, for that matter, only use a flexible plastic bottle (I use leftover seltzer bottles) and not a firm bottle like a SodaStream or, worse yet, a glass bottle, as those will be very difficult to use safely and are very likely to explode on you.

Anyway, the nice thing about brewed rootbeer is that the flavor will continue to develop over time in the refrigerator, and it won’t easily go flat, as the yeast will continue to ferment and carbonate it even while cold. (This will also increase the alcohol content over time.)

I highly recommend storing the bottle upright, if possible, as the yeast will form a sediment on the bottom of the bottle and this doesn’t have a very good taste or texture. Keeping it upright makes it easier to pour off the root beer without ending up with the yeast slurry.
Cold brew coffee Coffee Talk

Comments

Ingredients:

  • 75 grams coarsely ground coffee
  • 500mL cold water

Combine the above in a large enough jar or pitcher. Allow to steep for 12-24 hours, then strain.

I use a Hario mizudashi pitcher (affiliate link) to make the process a lot easier.

This is pretty great on its own, but with my most recent batch (using the same overly-caramelly dark roast as in the coffee soda experiment), I poured it into a nitro cream whipper (affiliate link) and gave it a nitro boost. The resulting coffee was a bit foamy (I probably shook it too much and brought in too much nitrous) but it tasted way creamier and sweeter, without any need for cream or sugar. And, this has the benefit of being decaf; as far as I know none of the local or chain coffee shops offer decaf cold-brew, and certainly not nitro decaf.

Just a word of warning: decaf coffee still has some caffeine in it, and the cold-brew process is extremely efficient at extracting every last little bit. If you’re particularly caffeine-sensitive you’ll still want to limit your consumption of this.

Piña Colada mix

Comments

For a simple piña colada mix, combine two 16-ounce cans of crushed or chunk pineapple (including the juice) and one 12-ounce can of coconut cream and blend until smooth. Then add a few tablespoons of lime juice.

This can be used for a whole bunch of things:

  • Make it into an actual piña colada by combining 1 shot of rum, 1 cup of mix, and a bunch of ice in a blender and blending until smooth
  • Combine with a splash of unflavored seltzer to make a virgin colada
  • Make vegan pineapple-coconut ice cream by putting this in an ice cream maker (rum optional)
  • Freeze into popsicles using popsicle molds (don’t add rum if you do this or it’ll never set)

Perfect eggs over-easy

Comments
IMG_1983.jpeg

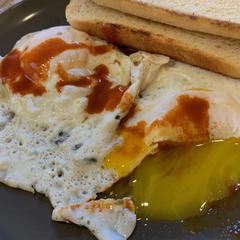
There’s a bunch of things out there about the way of making eggs perfectly over-easy, with fully-cooked whites but nice and runny yolks. Most of them involve either basting the eggs with oil, steaming them with a lid, or flipping them with much trepidation.

But my favorite way: heat the oil to medium-high, crack the eggs, wait for the whites on the bottom to set (1-2 minutes), and then set the remaining whites with a culinary blowtorch (Amazon affiliate link).

Perfectly-cooked whites, perfectly-runny yolks, and no breakage in sight!

Coffee soda Coffee Talk

Comments
IMG_1889.jpeg

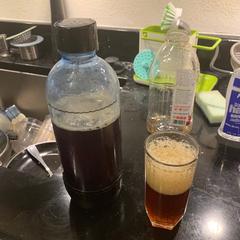
During the COVID-19 lockdown, my favorite local roaster had temporarily closed their retail shops, and being unwilling to spend $8 to get a bag of coffee shipped literally across the street, I decided to try to find other local roasters who made decaf that I could buy at the grocery store, with the hopes of finding something espresso-suitable. I failed.

Thankfully, Vivace reopened this week so I am now well-stocked on good coffee. But I still have a bunch of other coffee hanging around, so I decided, why not try making other things with it?

The first experiment: making cold-brew coffee soda.

Read more…

Improving my tamper Coffee Talk

Comments

I’ve been very much enjoying the Flair, and have gotten very used to pulling shots with it. Since the making of the video I’ve streamlined my morning routine, and also started using a cork trivet as a tamping pad, which is easier on my countertops and the portafilter.

The big downside to the cheapest Flair model is it doesn’t really come with a tamper though, it just comes with a dosing cup that sort of doubles as one. But it’s not very good.

Read more…

Brewing with Flair Coffee Talk

Comments

Today I got a Flair manual espresso maker, and I found that the manual that came with it was a little hard to follow, and the official “how to use Flair” videos were all about the higher-end models and also not that great to follow, and I couldn’t find any useful videos from reviewers on how to actually use the darn thing.

So after I played with it a bunch I figured out how to use it and drew a few shots (which all came out excellent! Espresso Vivace knows how to roast.). So I decided I’d share how I do it, which might be helpful for someone else.

Read more…

Pizza potluck

Comments

Every now and then I decide to have a party where I invite people over to have fun and chat while I feed them a bunch of homemade pizza. The format which seems to work best is a “pizza potluck,” where I provide the basics and everyone else brings interesting things to try as toppings. It’s a great party for someone who has a lot of friends but doesn’t have a lot of social energy and likes to make their friends happy and have people meet each other but would rather be a wall flower at their own party. Like me.

I’ve done this a few times now. Here’s some notes for things to do and things to avoid.

Read more…