Texturing guide
So you’ve adopted and/or become a critter and want to fulfill the obligation of being as many colors and patterns and materials as you can imagine. You have made an excellent choice! Here is how I do that stuff, myself. There might be better ways of doing it (there’s definitely a lot of things which feel like they could be automated, at the very least). If you find any improvements to this semi-annoying process, please let me know!
Creating new textures
For my texture creation, I primarily use Blender and Krita. For those who don’t know, Krita is a free, powerful graphics program that I use instead of Photoshop for this stuff, because I got tired of paying for Photoshop, and I don’t like working with Substance Painter either. If you prefer Substance Painter, feel free to use it, but I will be unable to help you with setting it up.
My primary workflow for creating textures is using Blender to draw mask layers onto the surface, and then importing those as transparency masks into Krita, where I assign colors based on them. I will also sometimes do texture painting directly in Blender, or directly in Krita, depending on what I’m trying to accomplish.
Going into a Blender texture paint tutorial is far outside the scope of this document, but for the most part, here’s how I make textures:
- In Blender I create a new color texture, called e.g.
mask-splotchesor whatever, and paint it onto the mesh. Black is where the texture will not apply, white is where the texture will apply. - I export this file as a .png, run an inpainting tool on it to help mitigate texture seams (more on this later), and then import the inpainted version into Krita as a new layer.
- In Krita I create a fill layer with the color or pattern I want, right-click the mask layer and select “Convert to > Transparency Mask,” and then drag this transparency mask onto the fill layer.
Note that the fill layer could also be anything else, for example it can be another image file if you want to have, say, stripes that modulate paisleys or something. It’s all up to you.
Anyway, sometimes I’ll also tweak fine details directly within Krita, although you have to take great care when doing it near the edges of UV islands.
Provided texture files
I have provided two texturing files, critter-body.kra and critter-details.kra. These are in Krita format.
If you want to work in Photoshop, that’s fine! Krita is a free download and should be able to convert them to .psd format. I cannot guarantee that the resulting files will be usable, though.
Anyway, here’s the general scheme for the files as they exist:
texturing body.kra: The albedo map for the body (i.e. parts that would conventially have fur)- UV layout: A togglable overlay to see where the UV boundaries are on the mesh (also provided as
uv-body.png) - Selection islands: a layer that you can use the magic wand tool on to quickly select a UV island (also provided as
inpaint-body.png) - tummypatch: The white patch on the chest and belly
- The remaining groups are various color schemes for the provided default materials
- UV layout: A togglable overlay to see where the UV boundaries are on the mesh (also provided as
texturing details.kra: The albedo and material maps for the fine details (eyes, hair, horns, etc.)- Info card: This is where my copyright information lives. Please always have this information visible in your creations.
- UV layout: A toggleable overlay for the UV boundaries (also provided as
uv-details.png) - Selection islands: a layer that you can use the magic wand tool on to quickly select a UV island (also provided as
inpaint-details.png) - Metallicity: The metallicity map
- Shininess: The reflection/smoothness map
- Generated normalmap: A baked version of the normalmap created from the “normalmap parts” group
- Normalmap parts: Heightmap data used to generate the normalmap
- Common bits: Things that are common to most common albedo maps (horns, pupils, teeth, collar, etc.)
- Hair streaks: I have a lot of gray hair in real life, so
- blank: Just a thing I can turn on to quickly blank out all of the non-common details
- Skin border overrides: There’s a tiny strip of skin between the nose and the rest of the muzzle which should be colored to match the muzzle surface, to hide the polygonal boundary of the nose. This is where I keep that stuff.
- Paisley, Calico, etc.: Groups for the various parts that can be colored with fill layers. These each contain a bunch of masked-off part layers:
- Throat and nostril attenuation: The color to darken the throat and nostrils by, obviously
- nose-lips: The color of the nose and lips
- mouth: The color of the “mouth bag”
- tongue: the color of the tongue
- irises: the color of the irises of the eyes
- sclera: the color of the so-called whites of the eyes, which are not typically white
- hair: the base hair color
- base color: Catch-all color for anything that’s disabled or whatever
Exporting into Unity
The process for generating albedo maps is pretty simple; turn off the UV layout, make sure the details' info card layer is on, and save the whole thing out as a .png that you then load into Unity.
Metallicity-Specularity maps are slightly complicated. Pretty much, enable just those respective groups and save them out. Then I use Poiyomi’s reflection baker (which is actually Thry’s texture packer) to produce a combined map for the shaders. Currently I just share a single one across all Skin-type materials (to save on storage and VRAM space), and the other materials don’t need separated maps.
Normal maps are… fun. Basically, to generate a new normalmap I duplicate the “normalmap parts” group, then merge it down, then run Krita’s “Height to Normal Map” filter (under “Edge Detection”), then move the result into the “generated normalmap” layr group, where it sits next to a few things that I had to specifically post-process to overcome shortcomings in Krita’s normalmap generator.
At some point I’ll come to my senses and just start using Substance Painter. I’m a stubborn critter.
Advanced topic: UV island inpainting
One issue that you might run into with texturing in general is dealing with gaps between the texture islands. Because of how texture mapping works in a graphics engine, you might get pixels “bleeding” in from the space between UV islands, especially when something is far away. This can end up as little distracting sparkles. You can generally mitigate this issue by having the area between islands be a base/average color for the whole character, but what if your character has a complicated surface coloring where there is no single correct base color?
The way I handle this is I use a technique called image inpainting, which was originally developed for art restoration (such as removing damage from works of art) but is also useful for this situation. Specifically, I use OpenCV’s image inpainting algorithm, which isn’t the best and isn’t fast, but I can automate it easily enough, which works well for my brain.
You might notice that there are two inpainting masks in the texturing files: inpaint-body.png and inpaint-details.png. These are masks that you can feed to an inpainting algorithm to algorithmically blend between the texture islands in a way that will minimize sparkly seams.
This is, admittedly, way outside of a standard art tutorial/how-to document. If you have an art tool with built-in inpainting functionality that you’re familiar with, I recommend using that. There’s also a few online inpainting tools, although I haven’t used any and can’t recommend any specific ones. Krita does have a function for it but I haven’t figured out how to use it; instead, here’s a simple Python script that runs OpenCV’s inpainting algorithm:
import cv2 # 'pip install opencv-python' to get this library
import argparse

parser = argparse.ArgumentParser(description='inpaint an image')
parser.add_argument('infile', type=str, help='Input image')
parser.add_argument('maskfile', type=str, help='Mask image')
parser.add_argument('outfile', type=str, help='Output image')

args = parser.parse_args()

print(f"{args.infile} {args.maskfile} -> {args.outfile}")
infile = cv2.imread(args.infile)
maskfile = cv2.imread(args.maskfile, cv2.IMREAD_GRAYSCALE)

print("Inpainting")
out = cv2.inpaint(infile, maskfile, 3, cv2.INPAINT_TELEA)

print(f"Writing {args.outfile}")
cv2.imwrite(args.outfile, out)
Whenever I generate a texture from Blender (be it a mask layer or an actual painted texture), I run it through the above script using the appropriate inpaint mask before pulling it into Krita. For example,
python inpaint.py mask-splotches.png inpaint-body.png INPAINTED-mask-splotches.png
Adding materials in Unity
So you’ve made yourself a nice material1, and now you want to show it off to the rest of the universe! Unfortunately, this is where things get a bit tricky, as VRChat have opted to stick to easy-for-them general functionality rather than providing things in the SDK for doing this very basic thing.
Namely, in VRChat, material switching is done via animations. This keeps things simple and consistent on their end, and they pass the savings on to you (in the form of a seemingly crushing amount of extra work).
Fortunately, I’ve written a complete guide on how to do this. Since the critter avatar already has a basic setup, you don’t have to follow the full steps, and you can skip right to the section on subsequent animations, keeping the following in mind:
- The PC materials and its animation controller are stored in
Critter/Materials PC/ - The Quest materials and its animation controller are stored in
Critter/Materials Quest/ - The material switching menus are in
Critter/Menus/
A critter-specific version of the guide follows.
Overall setup
I recommend creating a new folder in your project for your setup, and duplicating anything that you modify into it, so that changes to the base package won’t override any customizations you make.
For my own personal avatar setup (which has many differences from the for-sale version) I have a folder called fluffy which contains:
- A modified copy of the setup scene
- Alternate material menus
- Its own
Materials PC,Materials Quest, andTexturesfolders for its custom materials (with directory structures mirroring the main avatar’s) - Its own material controllers and animations within the respective materials directories, ideally with different names than the base avatar’s to make it easier to keep things straight (for example, mine are called
_materials pc fluffyand_materials quest fluffy)
If you take this approach (and I highly recommend that you do!) you’ll need to change the “Full Controller” VRCFury module (stored on the avatar itself) to point to the new material controller and root menu.
This approach also lets you (relatively) easily set up multiple versions so that you can keep a bunch of different material settings, customizations, etc. separate so that you can limit your VRAM usage or make separate versions for public vs. private places or the like.
PC setup
There are a few steps to adding a material to the critter. First, of course, you have to create the materials. What I like to do is to duplicate a similar material and rename and modify it as appropriate. I highly recommend keeping the “body” and “details” materials separate for each scheme you might want to set up; this makes things a bit easier in the future if you need to revise something in a way that only applies to one material. It’s totally okay to share textures between these materials, and an individual material doesn’t take up much space or VRAM (textures are what take up the vast majority of space).2
While working on the material it’s easiest to drag the new material onto your avatar in the editor and then edit the material from the avatar’s inspector (on the “Body” element in the scene hierarchy), although I usually just select the material itself from the project file browser and interact with its individual inspector.
Once you have your material setup, it’s time to add the animation to apply it in-game.
First, open your “Materials PC” folder, then select the “critter PC” avatar in the scene hierarchy. Look for the “Animator” section. The “Controller” should be set to “None (Runtime Animator Controller)”. Drag the material animation controller onto this slot. This will allow you to create new animations.
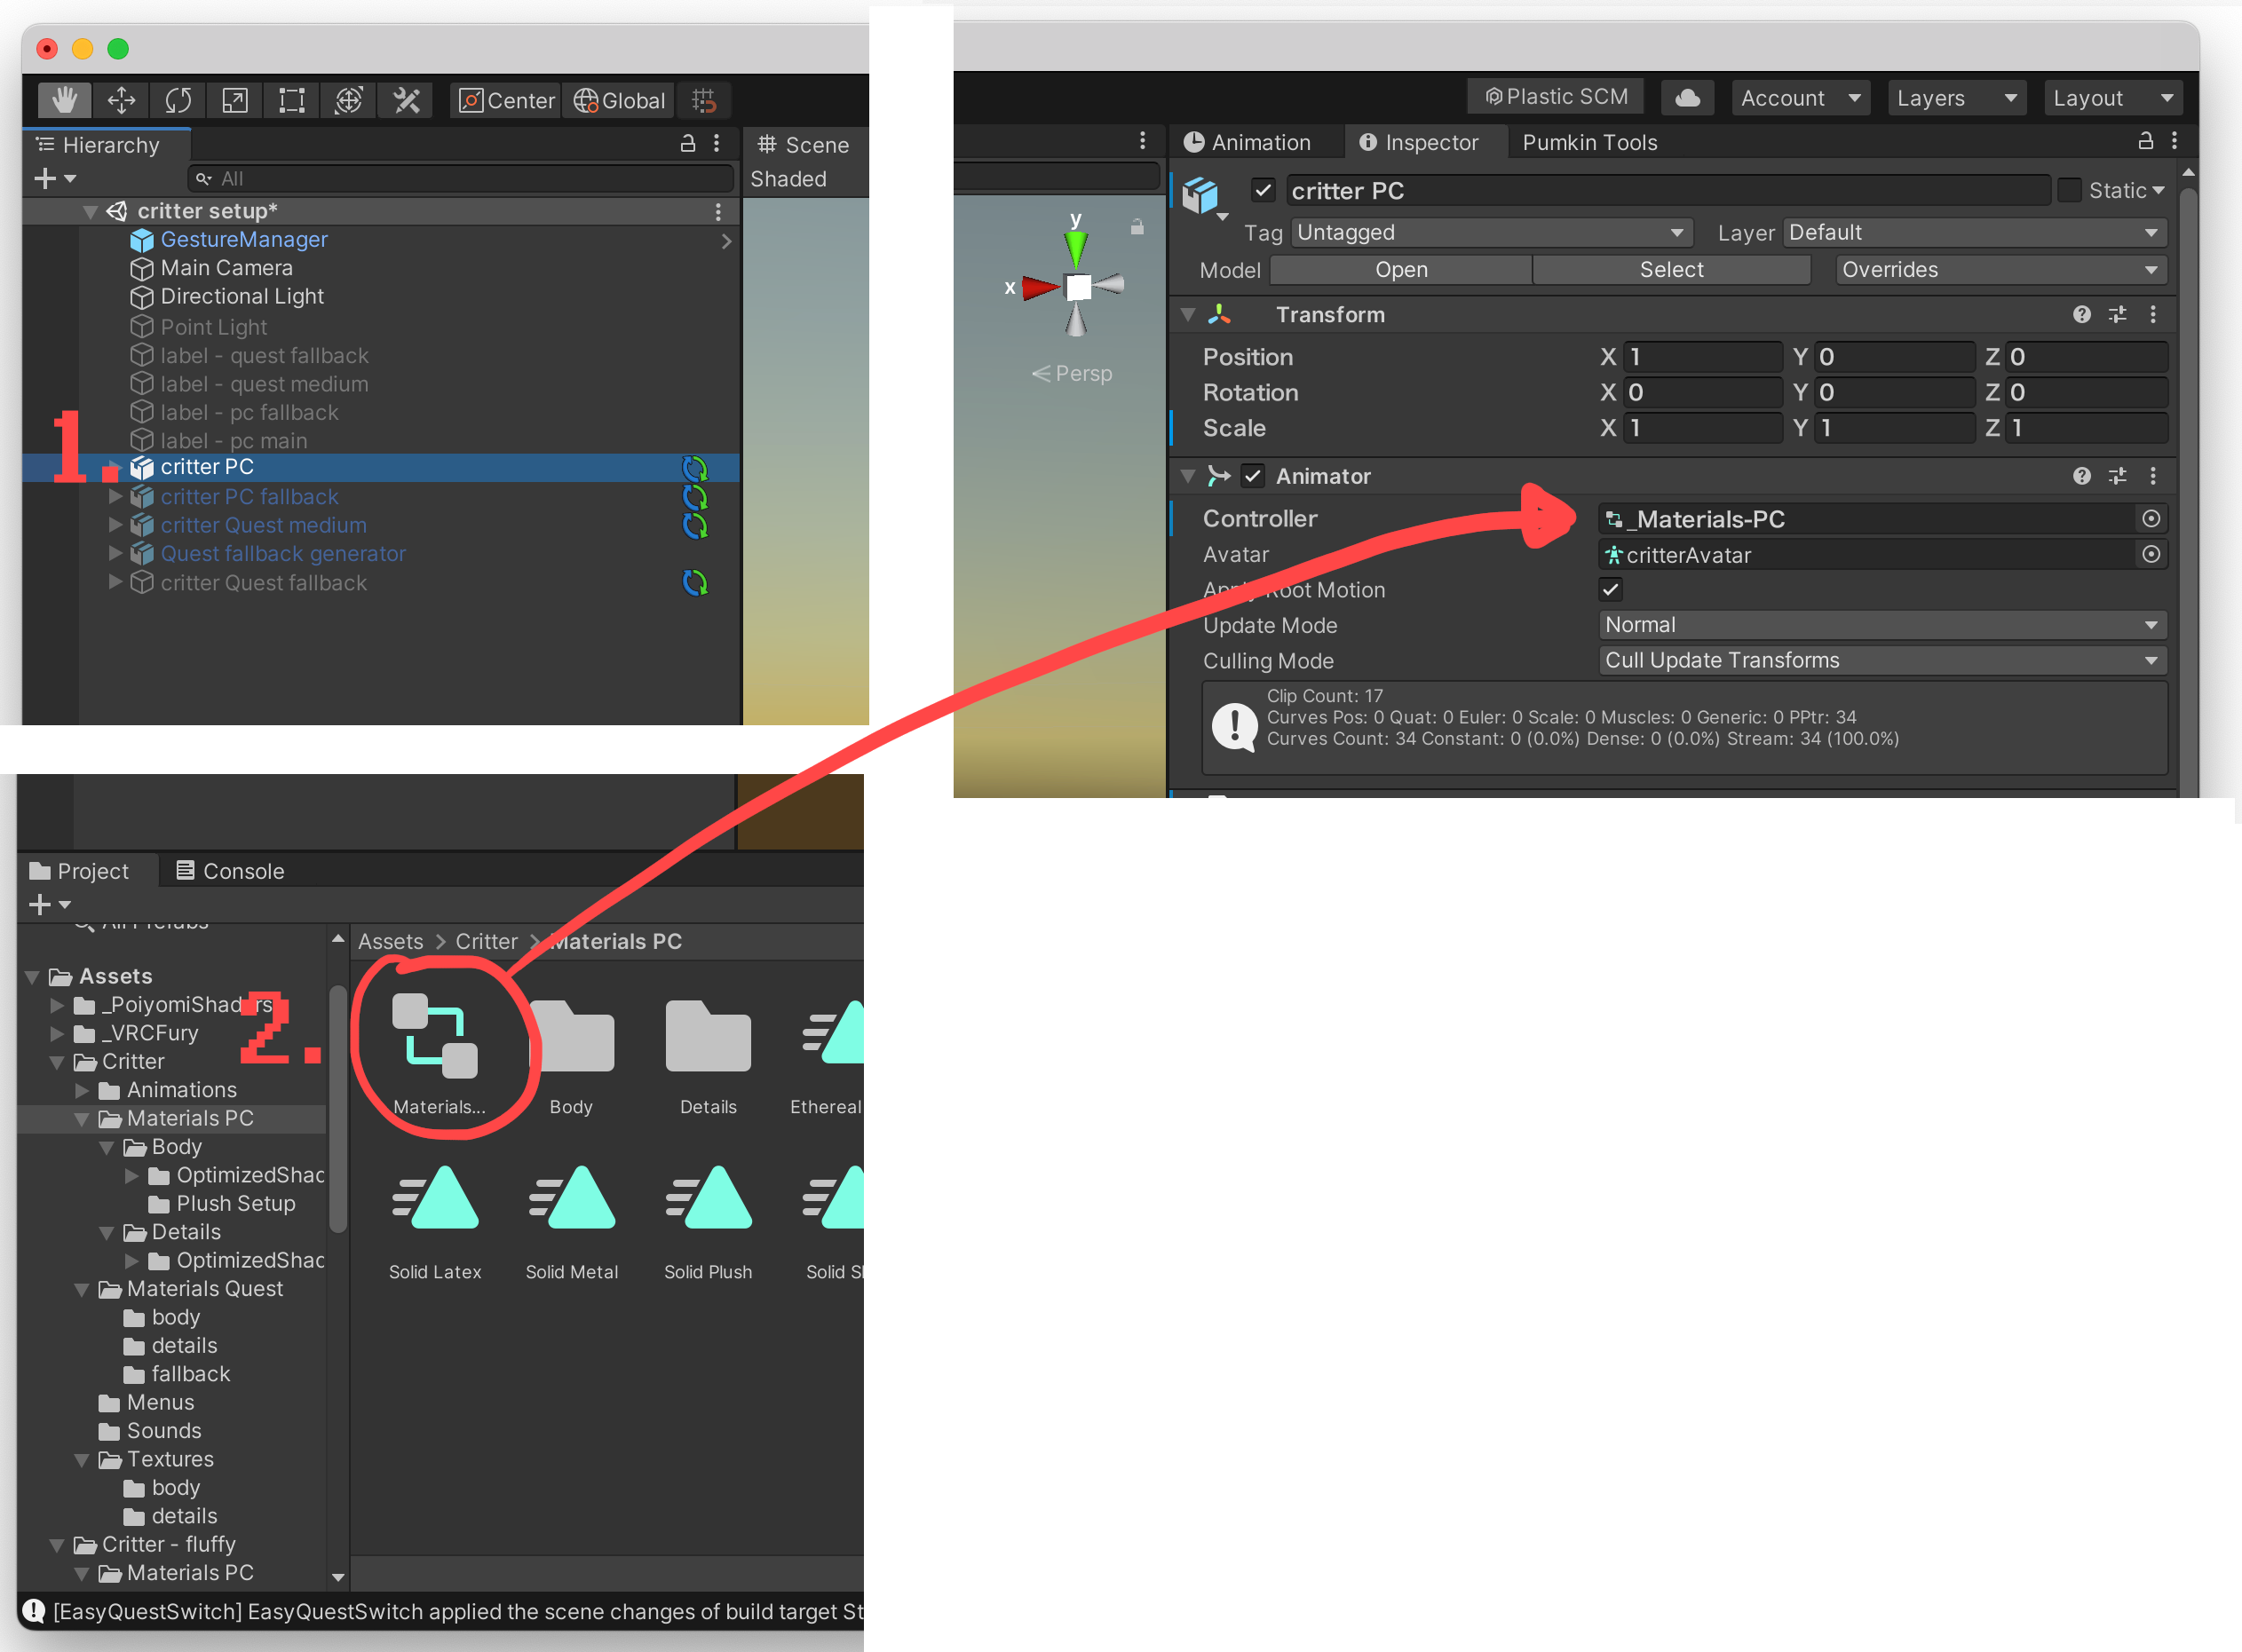
Also, double-click the animation controller from the project browser, which should bring up the Animator tab with a big pile of boxes and lines between them. This is where the animation state is managed.

Go back to the “Scene” tab, and open the “Animation” window (from the Window menu and Animation submenu). You’ll get a little box with transport controls and a little dropdown menu listing all of the defined material animations.

For each material you’re adding:
- Open the dropdown, and select “Create New Clip”
- Give the clip a meaningful name for the material you’re adding
- Press the record button (the red circle). Your avatar should change its pose, and you’ll probably need to adjust your view position.
- Drag your materials onto the right parts of your avatar. You should see new properties appear on the left-hand side, one for each material slot which changed.

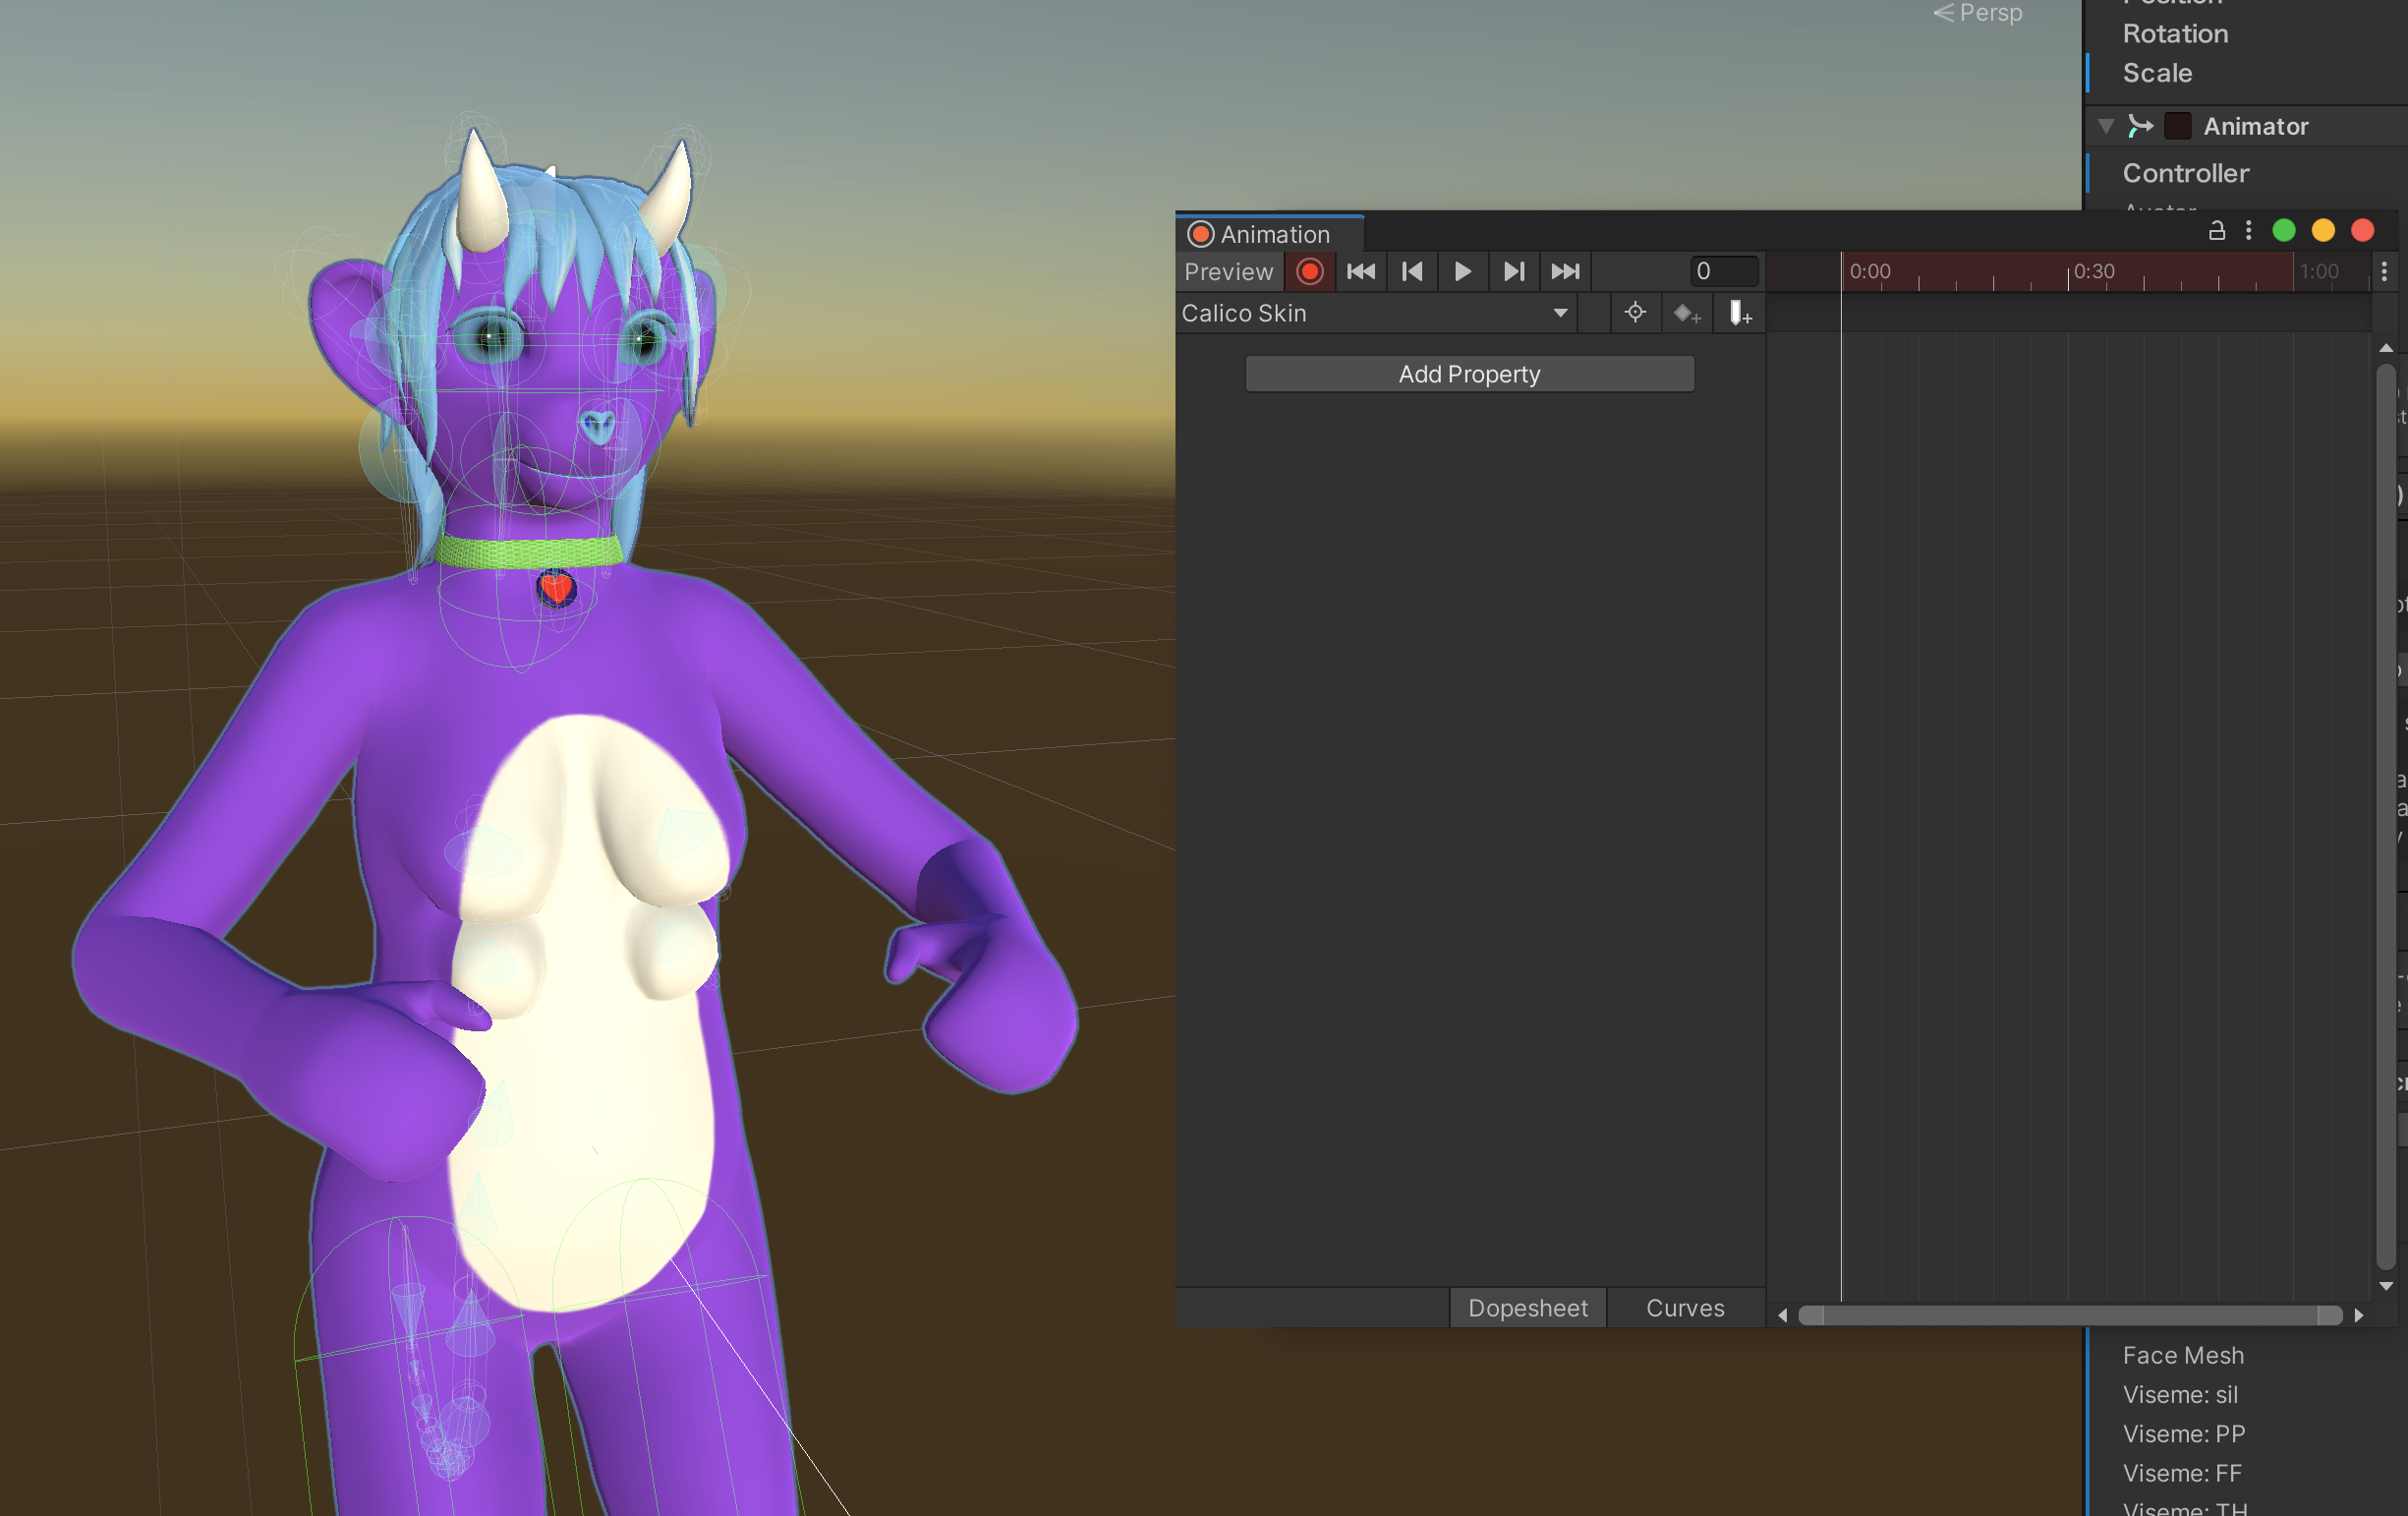

When you’re done adding these material animations, I recommend selecting a different clip in the animation list, which resets your avatar’s position.
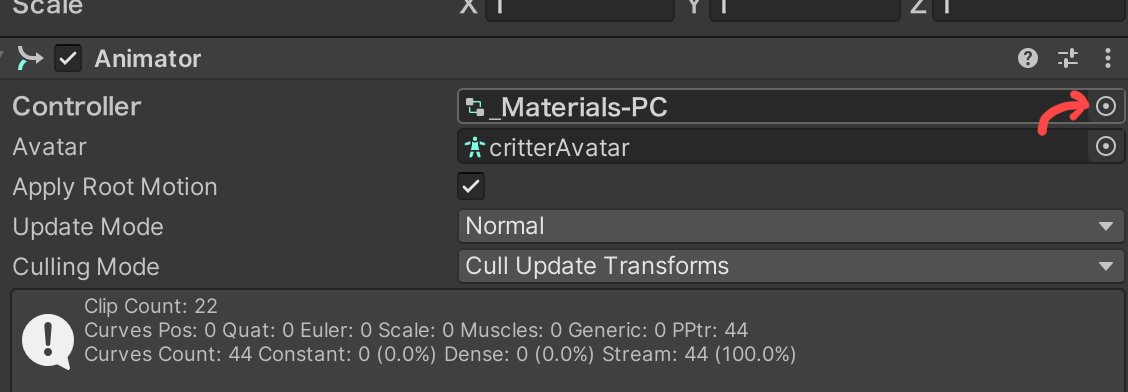
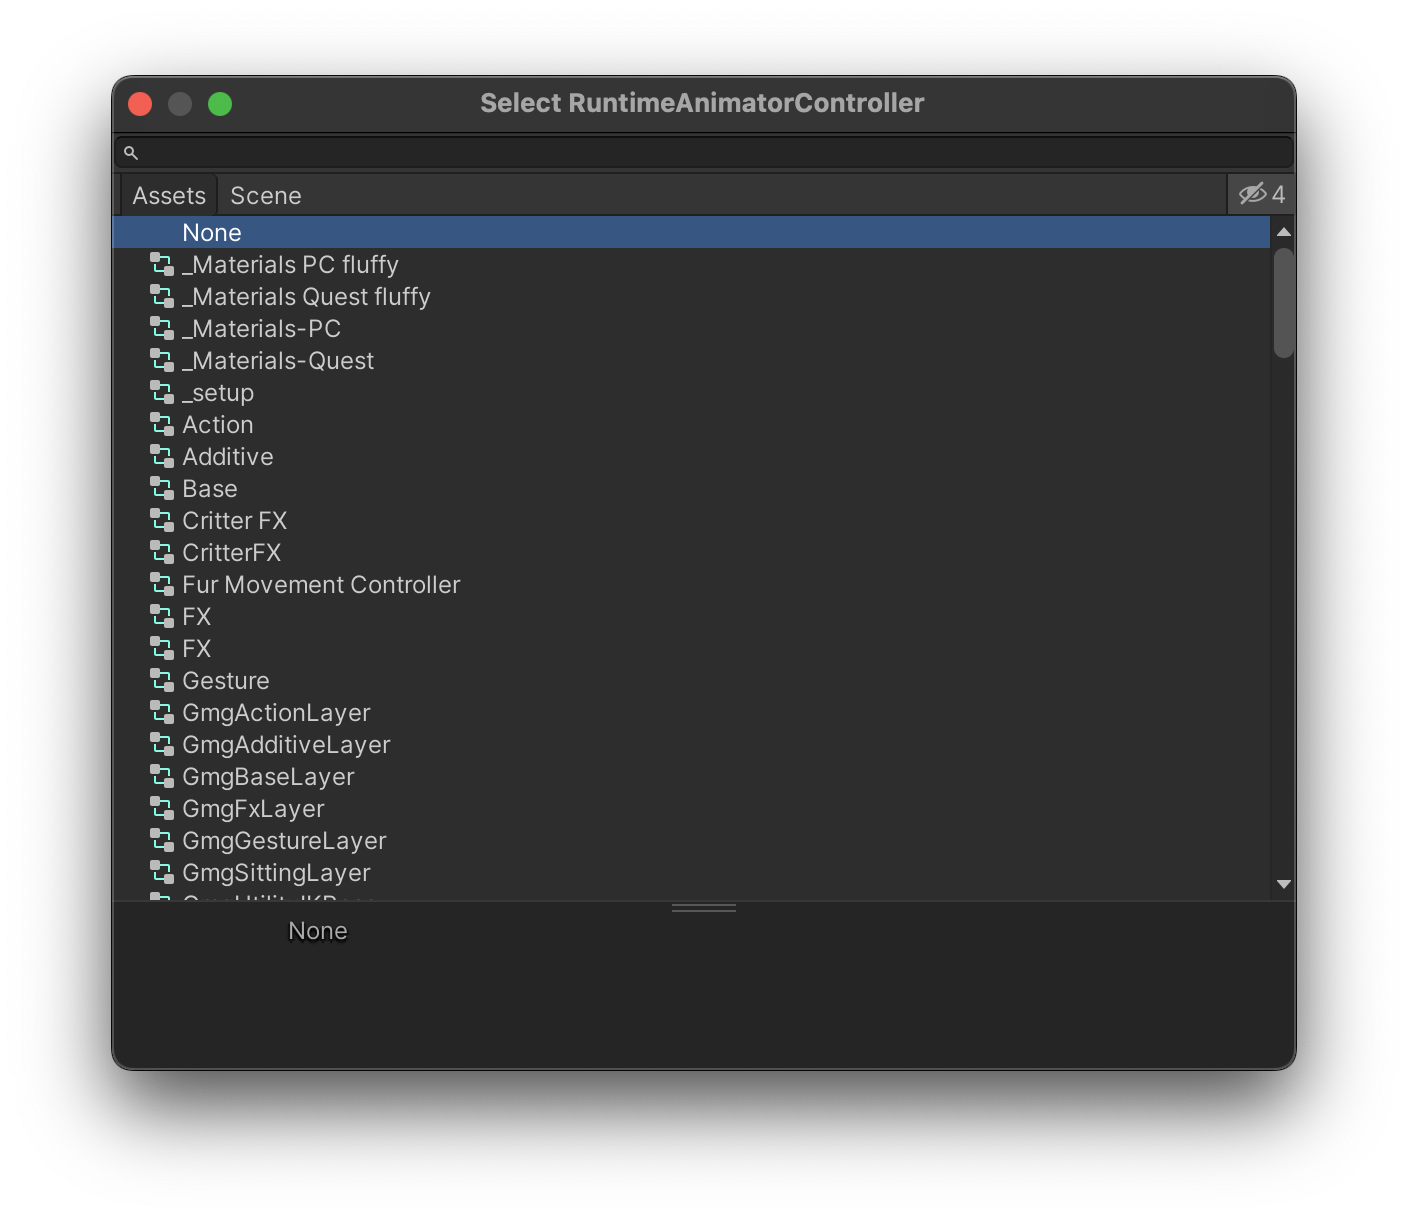
Finally, when you’re done adding material animations, remove the animator controller from the avatar (otherwise things may not work right); to do this, click on the little circle to the right of the animator on the avatar’s inspector, then click “None” from the little popup (you’ll need to scroll to the top of the list).

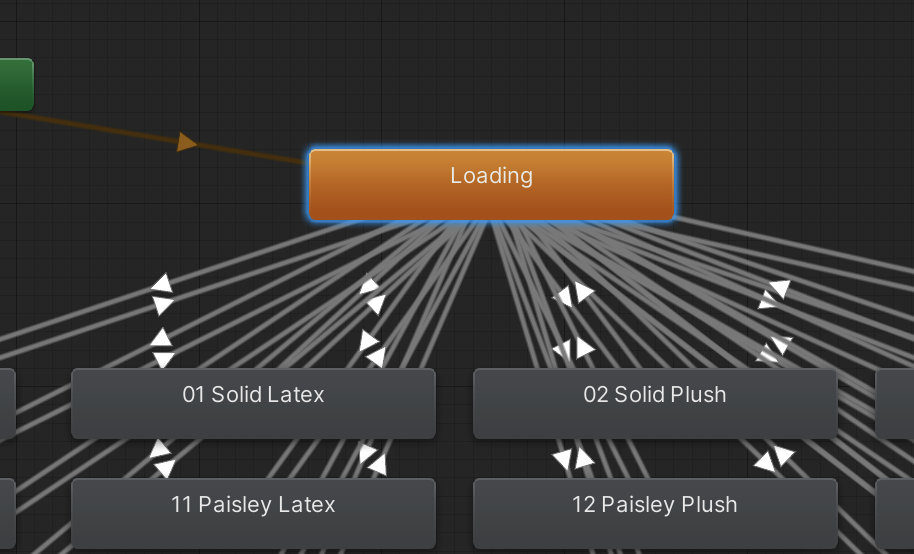
Now go back to your animator view (by double-clicking on _Materials-PC). You should see boxes for all of the new material animations you just added (you might need to zoom out a bit). Rearrange them a little to tidy them up, and then for each of the boxes, right-click on “Loading,” select “Make Transition,” then click on the new animation’s box, then right-click on that, select “Make Transition,” then click on “Loading.” Now there should be arrows pointing each direction between “Loading” and your new material animations.


Next, you’ll want to assign each material a unique ID (i.e. every one needs to be different). There’s no standard place to do this, so I just put it into the name of the animation state. This makes it way easier to keep track for the next steps! Which are as follows:
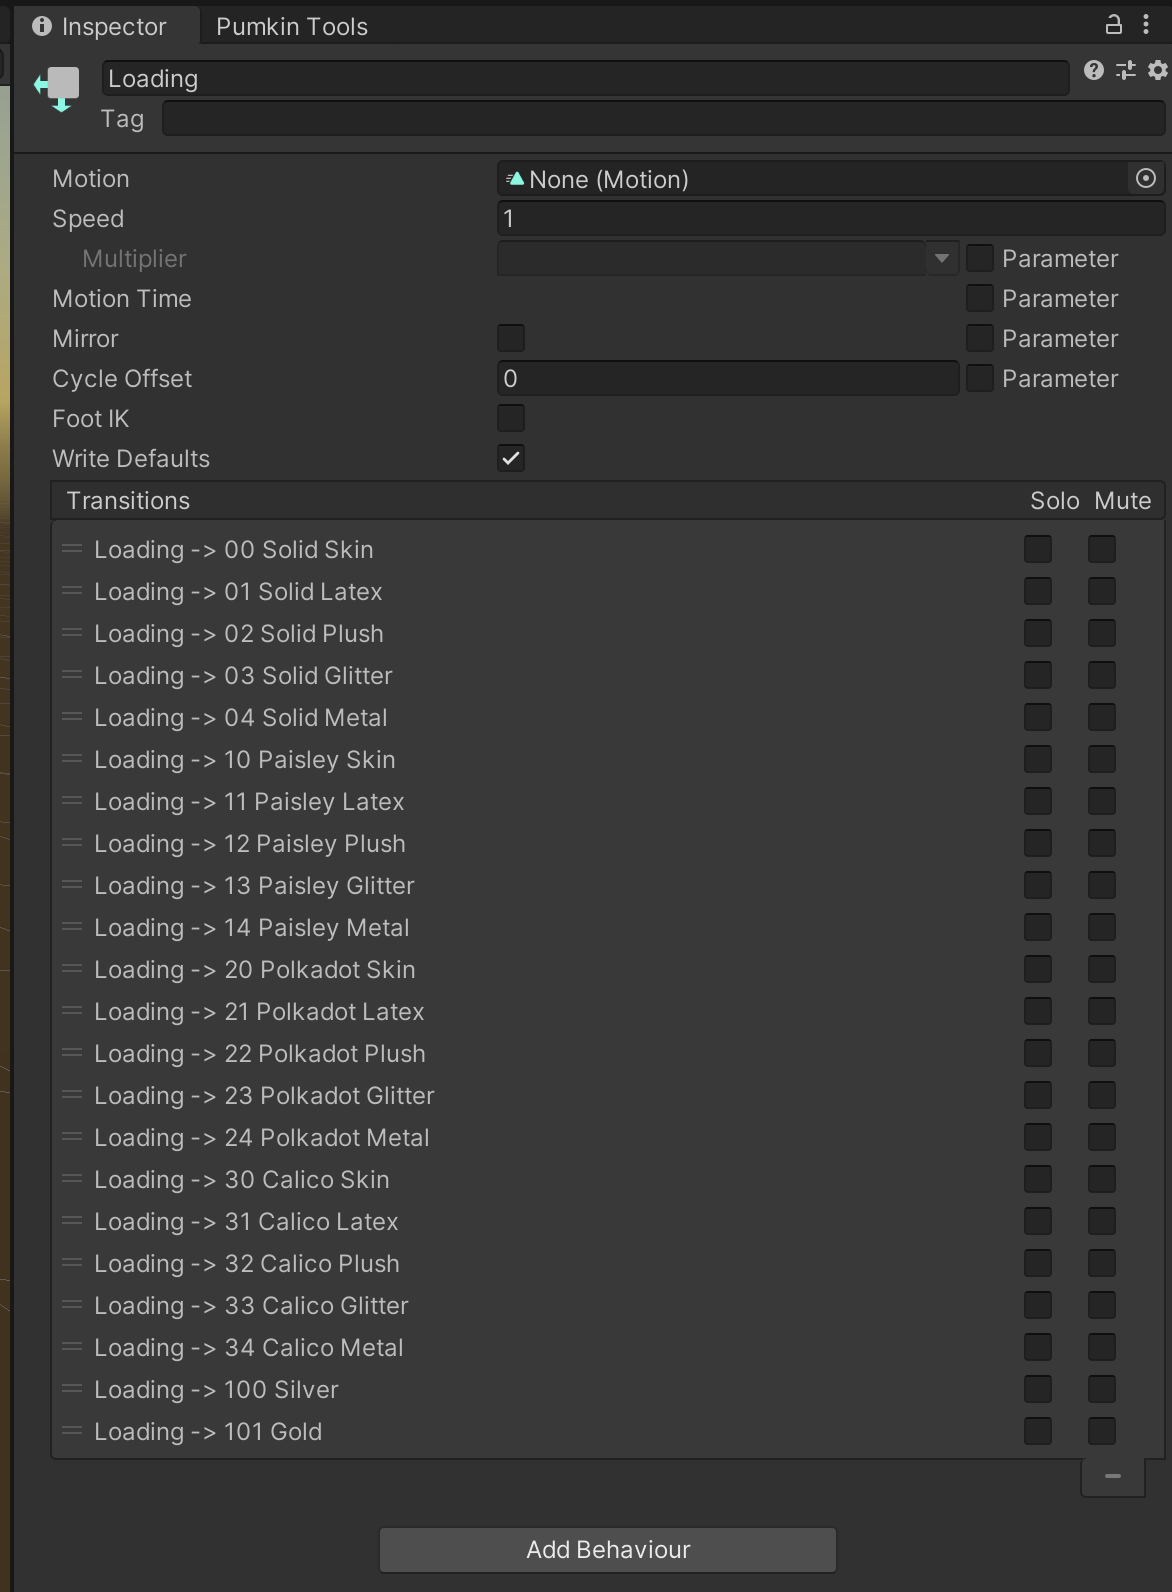
- Click on “Loading”
- On the inspector, click on the new material’s transition (e.g.
Loading -> 123 My New Material) - Uncheck “has Exit Time” and “Write Defaults”
- Open up the “Settings” reveal, and set the Transition Duration to 0
- Scroll down some more to “Conditions” and click the little + under the conditions list
- Set the new condition to read “
MaterialChoiceEquals(id)” replacing(id)with the number you assigned to the new material - On the “Animator” pane, click on the new material’s animation box
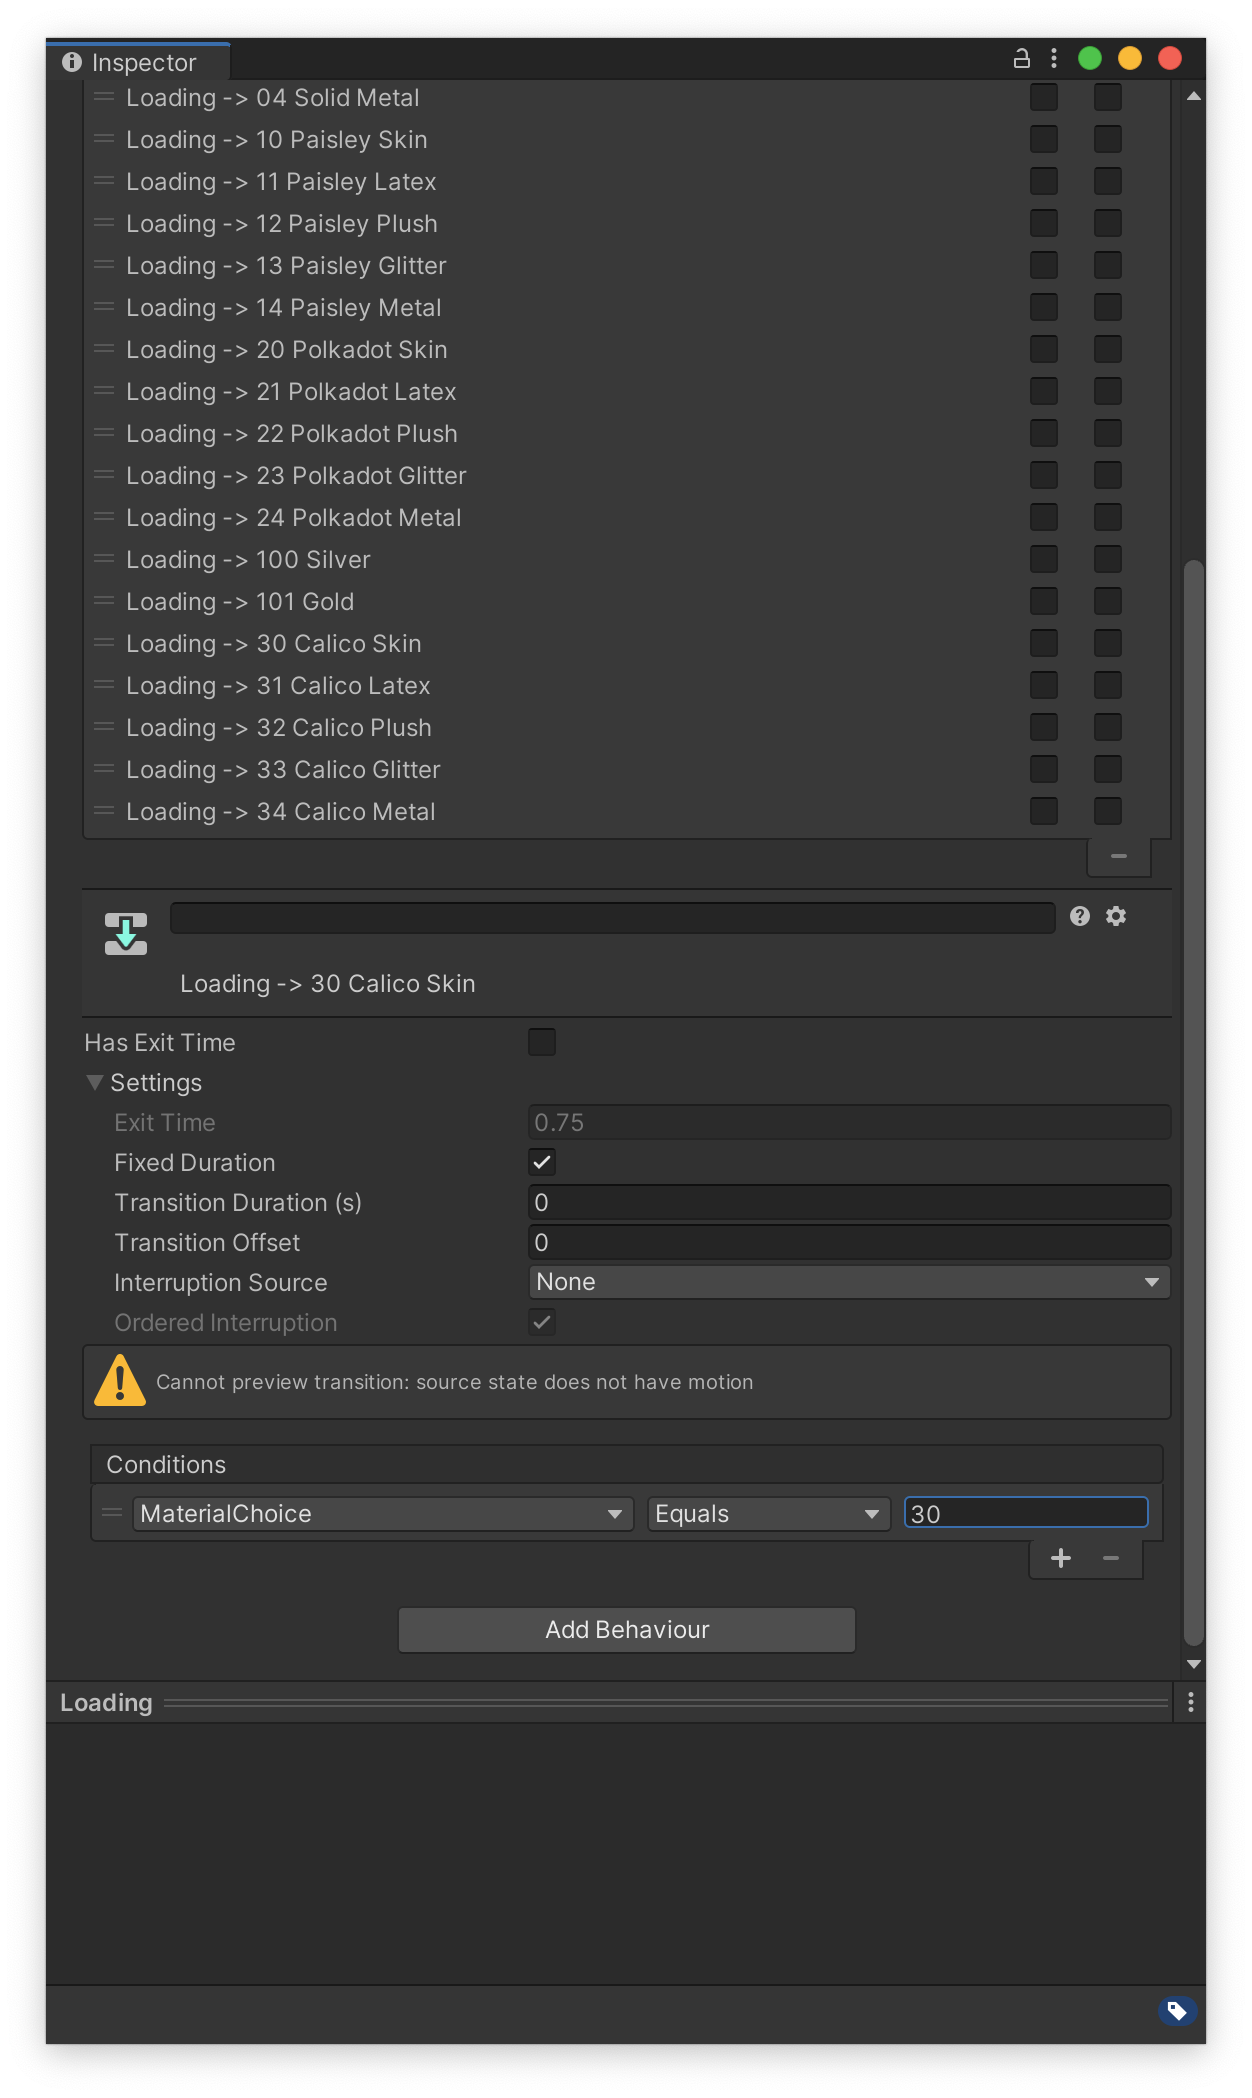
- Click on the transition back to Loading (e.g.
123 My New Material -> Loading) - Uncheck “has Exit Time” and “Write Defaults”
- Open up “settings” and set Transition Duration to 0
- Under “Conditions” add a new condition of “
MaterialChoiceNotEqual(id)”, again replacing(id)with your new material’s assigned ID

And there you go! When I do this for a bunch of materials at once I like to set all of the transitions from Loading all at once, before doing the individual transitions back to Loading.
Anyway, all that’s left now is to add the material to your menus! From the project browser, click on the menu you’d like to add it to, then in the inspector, click “Add Control.” Set up the new material with the following settings:
- Name: Whatever it is you want to call it
- Type: Toggle
- Parameter:
MaterialChoice - Value: the numerical ID you assigned to the material animation above
And there you have it, you should be able to use your new materials! And this makes the critter very happy indeed. Test the avatar as described in the “Testing the avatar” section.
Quest setup
Pretty much follow the same steps as the PC setup, except attach quest material animation controller to the avatar, and make sure that you assign the same material IDs as on the PC version. I also highly recommend putting “quest” in the name of your materials and animations, just to make it easier to keep track of which is which. (Believe me, it is very easy to accidentally attach a PC material or animation to the Quest animator!)
Note that you don’t have to set up all of your PC materials on Quest; any material that doesn’t appear in the Quest controller will simply fall back to whatever your default material is (i.e. the one that’s set in the editor). Or, if you want a different fallback than what’s on the in-editor model, apply its material animation to the “Loading” state.
And, of course, if you want a specific material on Quest to fallback to a different Quest material, you can create an animation state that maps that other material’s animation to the specified ID.
Quest fallback material
To update the material on the Quest fallback avatar, you have two options:
- Manually copy-paste your base textures over the texture file (
Materials Quest/fallback texture.png) - Regenerate the fallback using the process in the modeling guide (requires Polytool)
I personally prefer option 1.
Common Problems
I cannot add an animation
Make sure that all of these things are in place:
- You have set the avatar’s animation controller to the material setup controller
- You have the avatar selected in the scene hierarchy
My material won’t stick, or I can’t change materials after going to one, or my critter is stuck in a weird pose
Check your material animator:
- You have a transition both from “Loading” to the new material animation
- The transition from “Loading” to the material has a condition of “
MaterialChoiceEquals (id)” - The transition from the material back to “Loading” has a condition of “
MaterialChoiceNotEqual (id)” and that the animator ID is the same
Check other things, too:
- The menu item for the material is set to Toggle (not Button!) and that the ID matches the material’s animator ID
- You have removed the material setup controller from the avatar’s animation controller
Comments
Before commenting, please read the comment policy.
Avatars provided via Libravatar