My streaming setup
Streaming music production has its own set of challenges which aren’t well-addressed by the various tutorials out there. After a lot of iteration, here is a setup I ended up with that had a reasonable balance of flexibility and performance.
It should also be fairly adaptable to other situations where a single-computer setup doesn’t obtain the necessary performance.
(Note: Many of the external links are affiliate links, which help to support this website.)
Core Hardware
Work computer
- System: iMac 5K, upgraded to 48 GB of RAM via a 16GB kit and a 32GB kit
- Audio interface: A PreSonus Firestudio Project (discontinued), connected via a comical series of adapters (Thunderbolt 3 → 2 → FireWire 800 → FireWire 400)1
- Primary keyboard controller: A Native Instruments Komplete Kontrol S88 (see my not-very-useful review)
- A cheap 1080P TV (really any HDMI-savvy display will work, but a DVI monitor connected via HDMI→DVI cable will probably not)
- A USB-C to HDMI adapter
- Audio-Technica ATH-M50xWH headphones (as well as a few others, all connected simultaneously via a four-output headphone amp)
- A bunch of microphones, instruments, stands, etc. (not worth going into much detail on that)
Streaming computer
- System: a low-end HP laptop
- Several webcams which I got for small amounts of money (thrift stores are your friend)
- A crappy USB audio interface
- A MiraBox HDMI capture device with built-in HDMI passthrough
- A good powered USB hub
Physical setup
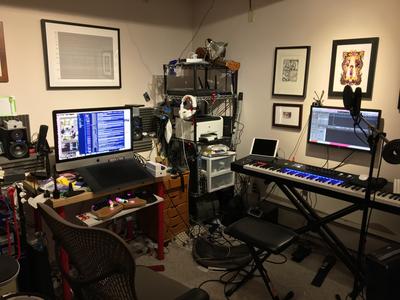
In the center of one wall I have the iMac. To the right of that, in the corner of the room, I have a makeshift equipment rack (built from Metro shelving) on which I keep the FireStudio and hang the headphones. I also have an additional MIDI interface there although it’s seldom used anymore.
Turning to the right, I have the 1080p display mounted to the wall behind the Komplete Kontrol S88. This gives me a nice way of directly interacting with my music software while I sit at the keyboard. I also keep the wireless keyboard and mouse (which came with the iMac) on top of the keyboard as a makeshift desk of sorts. The monitor is very helpful for other things, too, like I can put sheet music up on the screen and try to play that.
The laptop sits atop the keyboard, and is what actually runs OBS, as well as showing my Twitch dashboard and chat interface (which is now built-in to the Windows version of OBS). To make the setup a little less awkward the laptop is on a laptop stand.
Software
My DAW of choice is Logic Pro; not only is it what I’m used to (since I’ve been using Logic as my main DAW since late 2004) but it’s by far the best deal in music software today. You get a lot for your money, and even if you include the price of buying a Mac to run it on, it’s still cheaper than buying the equivalent software on Windows.
I’ve also spent way too much money on Native Instruments software (which is why I ended up getting the Komplete Kontrol to enjoy that integration). Most of the time I just use Logic built-ins, although some of the specific NI stuff I have is very helpful (Session Guitar and Session Strings 2 for example, and I also love the various piano patches I’ve bought, particularly The Grandeur).
For the actual video streaming I use mainline OBS, which gives me better control and flexibility than the other streaming apps I’ve tried (including Streamlabs OBS). This runs on the HP laptop.
Also, I use SwitchResX to manage my display setups. This is entirely optional but it makes my life a lot easier.
Connection routing
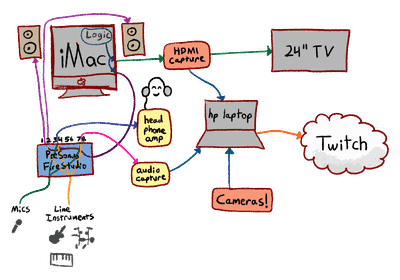
Okay, so this is where things get a little complicated.
I am doing all my work on the Mac, which doesn’t have very good streaming options (due to limited encoder selections and unreliability with the Apple hardware CODEC). Also, both Logic and OBS take a lot of CPU and disk bandwidth, and I could never quite get the stream to be stable. So, I have the external streaming laptop.
The Mac’s ancillary video output (from the USB-C to HDMI adapter) passes through the HDMI capture device on the laptop before going to the monitor.2
Then, anything sent to the external display gets captured as video on the laptop. I use the aforementioned SwitchResX to configure a number of display sets; my main ones are “mirror 1440p hidpi” (runs both screens at 5K, downscaled on the external one), “mirror 1080p” (runs both screens at 1080p, upscaled on the internal one), and “separate displays” (each screen is independent). Usually while I’m streaming from the keyboard it’ll be “mirror 1080p” and while I’m at the computer it’ll be “mirror 1440p hidpi.”
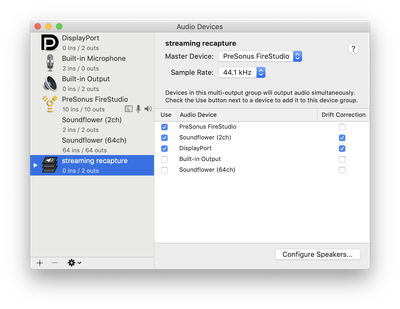
On the Mac I have also configured a virtual multi-output device in Audio MIDI Setup. It provides stereo input and sends its output along to the FireStudio, the HDMI port, and Soundflower3 simultaneously. (SoundFlower isn’t necessary for this setup, but I like having it around so I can do other audio capture stuff or capture video directly on the Mac if I’m recording my local screen for whatever reason.) In any case, I have configured Logic to use this virtual output. April 2020 Update: BlackHole is a more modern thing that does the same thing as SoundFlower, and is being actively-developed, so that might be worth looking into. I’ve experimented with it a little bit but haven’t formed an opinion of it vs. SoundFlower.
Next, the FireStudio Project has the ability to provide hardware submixes, which is to say I can configure different sets of audio inputs (including system audio) to go to its various output buses in different ways. Here are the three submixes I have configured:
Output 1/2: This submix is special in that it goes both to its own outputs as well as the “main output” outputs, which are controlled by the front-panel volume control and go to my monitor speakers. Everything gets output to them except for my microphones (currently on inputs 1 and 6); this prevents feedback from occurring when the monitors are turned up. This mix is never heard on the stream; it mostly exists to make my life easier.
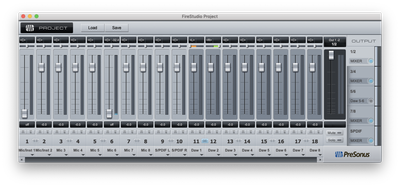
Output 3/4: Normally one would use the front-panel headphone output for headphones, but that uses the Output 1/2 mix, which doesn’t work for these purposes (since I need to be able to hear my own voice). Instead, this submix includes all channels and goes to the headphone amplifier, which has four outputs each with their own volume control. This lets me have multiple people in the studio each with their own volume level, and also gives me a way of patching in external audio recorders.
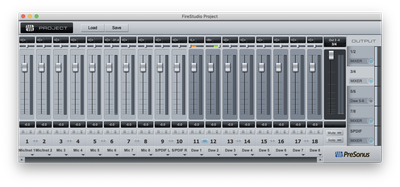
Output 7/8: This goes to the audio input on the streaming computer, and includes all of the live inputs but none of the system audio channels.
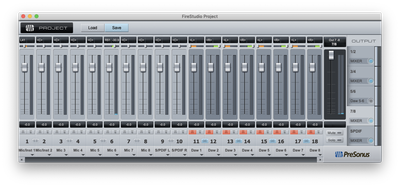
The FireStudio has two additional submixes available (one analog, one digital), which are unused at present.
OBS setup
My streaming computer is running OBS with a number of profiles that are appropriate to various streaming services (Twitch, Picarto, YouTube, etc.). They are all configured similarly (the main differences being stream setup and resolution/bitrate). Below are my settings for Twitch:
- Output:
- Mode: advanced
- Streaming tab:
- Audio track: 1
- Encoder: H264/AVC Encoder (AMD Advanced Media Framework) – use whatever hardware CODEC is on the system, if any
- Enforce streaming service encoder settings
- Rescale output to 1920x1080
- Preset: Twitch Streaming (this seems to be provided by the AMD hardware encoder)
- Rate control: CBR
- Bitrate: 3500
- Keyframe interval: 2
- Recording tab:
- Type: Standard
- Recording format: mkv
- Audio tracks: 1, 2, 3
- Encoder: Use stream encoder
- Audio tab:
- Track 1: bitrate 160, name “everything”
- Track 2: bitrate 160, name “live”
- Track 3: bitrate 320, name “system”
- Audio:
- Sample rate: 44.1KHx
- Channels: stereo
- Desktop audio devices: set to the internal sound and the USB audio interface (to capture system/stream overlay/etc. audio)
- Mic/Auxillary Audio Device: set to the USB audio interface
- Mic/Auxiliary Audio Device 2: set to the video capture device
- Video:
- Base (canvas) resolution: 2560x1440
- Output (scaled) resolution: 1920x1080
- Downscale filter: Bicubic (sharpened scaling, 16 samples)
- FPS: 30
- Advanced audio properties (found by clicking the gear on the mixer panel):
- All interfaces: monitor off, volumes set appropriately
- Desktop audio devices: Track 1
- Mic/Aux: Tracks 1 and 2
- Mic/Aux 2: Tracks 1 and 3
- All other tracks disabled
The reason for these separated tracks is so that I have precise control over my recordings, should I choose to edit them for posting to YouTube or the like. The original live audio mix, including any streamlabs alerts and so on, goes onto track 1 (“everything”). Track 2 only includes what I’m doing live – microphones, external synths, etc. – and track 3 only includes audio that comes directly from Logic, typically the music I’m working on and any internal softsynths.
I could also set up track 4 to have only the laptop’s “desktop audio devices” so that if I really want to be able to mix in stream alerts (without deferring to the live mix) I can.
And here’s what my main OBS scene looks like (for Twitch, anyway):
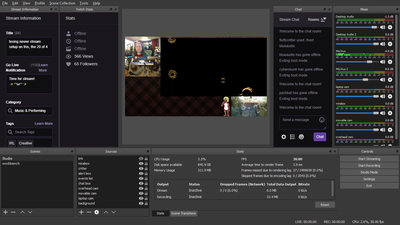
The sources are:
- brb: a text overlay which says “brb”
- mirabox: the HDMI capture device
- critter: the picture of the critter
- alert box: Browser source pointing to the Streamlabs “alert box” widget
- events list: Browser source pointing to the Streamlabs “event list” widget
- chat box: Browser souce pointing to Streamlabs' chat overlay
- overhead cam: A Logitech HD webcam I have stapled to my ceiling (okay, not actually stapled, but the mounting solution does involve paper clips); this is the one in the middle of the left column
- movable cam: A Logitech HD webcam attached to a mini-tripod that I can move around (it’s also connected via a long USB extension cord); this is the one in the lower-right corner (points at whatever I want, usually either Fiona or it sits atop my Mac’s screen in case I’m sitting at the desktop)
- laptop cam: The camera built-in to the streaming laptop
- background: the awesome plaid
Advantages to this setup
One thing I like about this setup is I have complete isolation between the computer that’s displayed and the computer doing the streaming; this minimizes my chances of accidentally showing private configuration to the stream, for example. I also have good control over what’s visible to the viewers; I can set the monitors to “separate displays” and have stuff up on my internal display that isn’t visible to the stream either.
Also, by having the encoding offloaded to another computer, I get the full performance out of Logic without having to skimp on stream quality.
The separated audio tracks are nice to have; my locally-saved video files let me use the live mix from the stream itself, or get pure audio from just the system (without noisy external inputs), and I can selectively mix in the external inputs as needed, albeit at lower quality than I’d like (since the secondary interface is pretty noisy).
Disadvantages to the setup
This setup isn’t without problems, however!
One big downside is that I have no built-in way to capture just a single window on OBS. I can sort of work around this by using OBS-NDI to send a specific window (or local layout) to the laptop from the Mac, but in my experience OBS-NDI is pretty unreliable and takes a lot of CPU.
Another issue is that since I use Night Shift (which is basically Apple-branded f.lux), the late-night color shift that’s applied to my display is also applied to the stream. The only workaround to this is to disable Night Shift.4
I’m also not capturing the monitor at its full native resolution; the 1080p output gets effectively downsampled to 810p in my standard layout, which is still fine but it does impact the legibility of the UI, and also means that if I edit for YouTube I’m pretty much stuck with that if I crop out the cameras and chat and so on. (I can of course set up other layouts with different tradeoffs between cameras, chat, and screen capture.)
This particular laptop (which I bought because it was cheap, admittedly) also doesn’t have a lot of USB bandwidth; I’d love to have a permanent camera pointed at where Fiona normally hangs out, but the system couldn’t quite handle it. I also don’t have any convenient way to get the built-in camera on the iMac, although being able to place the movable camera atop the iMac makes up for that when I need it.
Finally, it’s a bit annoying to have a separate keyboard and trackpad for controlling my stream vs. everything else. Not to mention having the physical imposition of it on my space. There are certainly fixes for this but for now I’m fine with just having to juggle two sets of inputs.
Notes
In a previous iteration of this setup, I had all of the hardware hooked up to my iMac (the laptop wasn’t involved at all). This was great from a quality standpoint but the Mac couldn’t keep up with both running Logic and streaming. But it did allow me to do single-window and high-resolution capture; if I ever need to do those things for offline recording, I can still run OBS locally on the Mac and use the Apple hardware CODEC for actually recording. I won’t get the microphone track but in that situation I’m generally overdubbing separately-recorded voice anyway.
Also, the MiraBox isn’t the first HDMI capture device I tried; when I first started getting into streaming a few years ago I got an AVermedia ExtremeCap U3, which was a pretty popular device for Twitch streamers at the time – as there weren’t a lot of capture devices that would capture HDMI over USB. Nowadays, there are many affordable HDMI capture devices such as the MiraBox (and many similar devices), which I have found to be way more reliable and easier to setup. In particular, they pretty much just convert HDMI inputs into a standard webcam. There’s no need for proprietary drivers, extra capture software, or dealing with increasingly-complicated configurations just to try to get the external video at a decent resolution.
One particular weirdness I run into with the MiraBox is that it doesn’t always capture audio, or at least the audio it captures doesn’t get sent along to Windows. I’ve found that if it’s not picking up audio, the trick is to go into the Windows sound device properties and toggling the “listen to this device” setting on and off a few times.
Also, since the external display is a cheap TV, it came out of the box with some rather annoying sharpness and vividness-boosting settings enabled. Setting the sharpness to 0, setting the zoom to “100%,” and disabling the internal speakers went a long way to improving how it looks. An HDMI computer monitor would be less likely to have these issues, although then you run the risk of it not supporting the colorspace required by the capture device.
Another thing worth noting is that while the specific TV I bought (a Sceptre) supports powering down when the HDMI signal is lost, it doesn’t support automatically powering back on when the signal comes back. So, if my displays go to sleep I have to manually turn it back on. It isn’t a big deal though.
Acknowledgments
Thanks to members of SOBA, especially blueaudio, for being a sounding board (so to speak…) for my various configuration iterations, and for convincing me to switch to an external encoding machine even with the limitations (seeing as how practical requirements overrode theoretical nice-to-haves anyway).
Comments
Before commenting, please read the comment policy.
Avatars provided via Libravatar