VRChat avatar creator resources
Here are some of my collected notes on things that I’ve found helpful when it comes to building avatars for VRChat.
The intention is that this will be a living document that I add to as I learn more. This document is also currently a complete mess and will probably be split up into separate things at some point.
Environment setup
VRChat recommends the use of the VRChat Creator Companion to install and maintain the SDK and many popular plugins. Unfortunately, this doesn’t work very well on Linux or macOS, and I do most of my avatar development on a Mac. Fortunately, there are several alternatives to VCC; in particular, I like ALCOM, which is opensource and cross-platform.
Existing avatar bases
Really, the best way to get started with avatar creation is to purchase someone else’s avatar base and pick it apart to see how it all works.
Here’s a few avatar bases that I’ve found particularly useful for these purposes:
- Dom’s Wolfiiyan
- Flufi and Sanobu by Zoidberg656
- The Jinxed Kobold by dont_jinxit
There’s also a few free ones out there that you can use as a reference; Ghostt’s Morph is particularly interesting in terms of a lot of its design aspects and demonstrations of how to do some pretty intense things in VRChat.
And, of course, my own avatars might be helpful for someone.
Modeling
Most folks model using Blender. Blender is kind of hard to learn, and the UI changes enough over time that you often have to re-learn things. But it’s worth keeping up with, as it’s a quite powerful modeling package with a lot to offer!
Here are some tutorials I’ve found particularly helpful:
- Blender Modelling for Absolute Beginners by PIXXO 3D
- How to model a stylized female body by Astria
- 2D Drawing to 3D Model by Eve Sculpts
- Do you really need to spend $500 on a Blender? by America’s Test Kitcheeeey waitaminute
A lot of guides on VRChat modeling in particular suggest using the Cats Blender Plugin, although it seems to always be a few Blender versions behind and I’ve never managed to get it working. With my particular modeling workflow, I’ve not found it to be all that necessary anyway. That said, there’s an unofficial fork that attempts to stay more up-to-date with current versions of Blender.
I tend to keep all of my avatar components within a single mesh object (which is way better for performance) and use material slots to distinguish different parts. This means there’s no reason to bake a mesh down (since it’s already a single mesh to begin with), and for things like polygon decimation I use the built-in mesh decimator.
Topology
- Topology Guides has some great resources, such as their edge loop reduction flows (thanks, Lagos!)
Decimation
One annoying thing about the built-in decimator is that, at least as of Blender 3.6.0, there’s no way to target a specific polygon count; it’s all based on ratio. My solution to this:
- Right-click on the status bar and make sure “scene statistics” are enabled
- Divide your target triangle count by the “tris” count in the status bar and round down to the thousands place (for example, if your scene shows 45.962 triangles and you want to get down to 20,000 triangles, your ratio would be \(\frac{20,000}{45,962} = 0.435\))
- Use that value in the
Mesh > Clean Up > Decimate Geometrypopup for each of your meshes
This won’t get an exact count (for example, when I decimate my 30,620-triangle avatar with a ratio of 0.489 I end up with an output of 14973) but it’s Close Enough. Ideally Blender would let you target a count and/or provide more digits of precision, but it’s all just numbers, man.
Weight Painting
Doing your mesh bone weight painting is really annoying. However, one trick I’ve found that makes it a little easier is to go into Pose mode and then moving the skeleton around until something looks off with your mesh. Then go into weight painting mode, and the mesh will reflect your current weights relative to the pose, which makes it much easier to see how your painting/blending/blurring/etc. is fixing things as you go.
Maybe this is obvious to everyone else, but I think it’s neat.
Blend shapes/shape keys
Please, please, please make sure you’re on your Basis shape key if you’re trying to make a change for the mesh as a whole. I’ve lost track of all the times I’ve been doing some major edits to the mesh only to realize too late that I was on one of my visemes!
If you do end up doing this and the edits you were making were localized to specific body parts, you can usually fix this by selecting the affected polygons, and then going to Vertex > Propagate to shapes. But note that if these vertices are otherwise affected by some of your other shape keys, you’ll probably have to redo those shape keys!
Symmetry
Also please do yourself (and others who are editing your mesh) a favor, and make sure that your mesh’s symmetry is staying, well, symmetrical, wherever appropriate. It’s really annoying to try editing some aspect of a mesh (such as ear sizes, pawpad thickness, etc.) only to find that the mesh symmetry has been messed up.
One quick way to check to see where your mesh’s symmetry has fallen apart is to select all vertices and then mirror your selection (ctrl+shift+M by default) once or twice. Any vertices that are no longer selected are also not symmetrical.
Sometimes you can recover the symmetry by selecting the affected vertices and then Mesh > Snap to symmetry and fiddling with things until they work out, but often you’re going to have to redo some of your mesh topology.
And of course there are often parts of the mesh that you want to be asymmetric (such as hair or snaggly teeth or the like). That complicates things, of course.
A tiny rant about a tiny thing in Blender
I really wish the “triangulate faces” tool had a confirmation on it. There are so many times that I accidentally press ⌘T instead of ⌘R and don’t notice that all of my quads have been turned into tris until it’s too late (usually when I go to add another edge loop somewhere and I’m like WHY ISN’T THIS WORKING).
Sometimes you can recover from that with Face > Tris to quads but in my experience you have to be very careful with that as both operations are destructive and lossy, especially when material boundaries and texture seams are involved.
FBX export
While FBX is a “universal” model format, there’s a lot of little details that you need to get right or else things will go screwy. Here are the settings that I use:
- Limit the export to “visible objects” and select just “Mesh” and “Armature”
- Under “Transform,” make sure “Scale” is 1.0 and “Apply Scalings” is set to “FBX Units Scale”
- Under “Geometry,” make sure that “Apply modifiers” is disabled
There’s a little “operator presets” thing you can use to save your settings for easy recall.
VRM stuff
Having a VRChat avatar, you might also want to make a VRM version for VTuber purposes. A lot of tutorials point to a Unity-based system for creating VRMs. It doesn’t work very well for me. Instead I’ve had really good luck using VRM Add-on for Blender, which lets you do the VRM export directly from Blender.
MMD stuff
MMD shapekeys are a huge pain to set up. Copy to MMD Visemes makes it a lot easier, at least for setting up the shapekeys. Here’s a useful chart of what the keys should look like.
Subdivision modeling
When I’m working out an avatar’s proportions and general shape, I like to keep the mesh as a subdivision surface, using the subdivision modifier, and I wait until pretty much the last minute to apply the modifier permanently. This includes me setting up my basic blendshapes (or shape keys, as Blender calls them) and even rough weight painting while still in subdivision mode. However, there isn’t an easy built-in way to apply the subdivision modifier while preserving the shape keys.
Fortunately, there’s a very handy script which allows you to apply your subdivision modifier while preserving all shape keys. While I’m still working on the rough body shape I’ll save, then run that before doing my FBX export, export, then undo. Sometimes the mesh gets corrupted during the undo for some reason, which is why I save beforehand.
Texturing
First off, Blender’s built-in UV unwrapping is pretty okay, although it works a lot better if you remember to add texture seams to your object so it can automatically split your islands.
It’s pretty abysmal at texture packing, though. I use UVPackmaster, which costs money ($44 at the time of this writing, although there’s often discounts available) but is well worth it.
A lot of people use Substance Painter for their texturing. I am personally not a fan of it for multiple reasons.
Fortunately, Blender has a Texture Paint mode built-in that’s sorta okay. Its UI is a lot better than Substance, anyway (IMO).
Unfortunately, it’s only sorta okay. It’s missing a lot of stuff that would make it truly stellar. Most notably it doesn’t seem to support any sort of “layers” concept, and only lets you modify one channel at a time. It’s good for roughing stuff out but not great for doing fine detail work.
In my texturing workflow, what I do is use Texture Paint mode to draw layer masks for different elements, and then import those masks into Krita as a “transparency mask.” Most of the texturing I do is in the form of large patches of solid colors, so that works out okay for me.
Another useful thing that’s easy to miss is “Quick Edit,” which captures a high-resolution screenshot of your model, sends it to your image editor of choice, then projects the resulting image back onto the texture. This is a really good way to tweak details where Blender’s own paint brush tools fall flat. Explaining it in text is a little tricky, so here’s a pretty good quick tutorial I found.
There are also a few Blender addons that do provide layer support, including PSD Layers and ucupaint. I’ve not used them much so I can’t speak to their quality, although ucupaint is getting pretty popular. Both of these work directly within Blender’s own material engine, which is nice in that you never have to leave Blender, but less-nice in that there doesn’t seem to be any easy way to swap between different material setups on a single mesh, or any way to import/export to an external layered file such as a PSD or XCF or the like.
There’s also Armorpaint which is basically an opensource clone of Substance Painter. Its functionality is a bit limited (especially when it comes to meshes with multiple material slots) but it shows a lot of promise.
Shaders
This is where a lot of fun comes into VRChat. In general, there are two shaders you want to seriously consider using:
- Poiyomi, an incredibly comprehensive collection of shader techniques in one big master shader that gives you incredible expressiveness (with both free versions and paid; I’ve only used the free version, personally)
- Warren’s Fast Fur, perfect for a wide variety of soft surfaces. I own the paid version, but the free version is quite good too.
There’s a few other shader things to look at though:
- Shader Forge, a visual shader authoring environment (similar to Unreal’s material graphs)
- Normalized Crow’s Lava lamp, great for adding ambient energy to things and generally being Weird (although note that it’s very poorly-performing in general)
- VRChat Goo Shader which is great for both being a gooey mess but also for having incredibly intense transformation animations between materials; also version 2.0 is incredibly versatile and is more of a framework than a single shader
Almost all of the shader work I do is using Poiyomi. It’s incredibly versatile and pretty much everything I’ve wanted to implement a shader for myself is included in it.
For example, here’s a TV static material and its associated texture, which is all done using stock, free Poiyomi!
Fallback avatars
There’s a slightly confusing thing about what a “fallback” avatar is in VRChat. There are two things commonly referred to as a fallback:
- You’re on desktop and you select an avatar that has a Quest version, and Quest users see that Quest version
- You’re on desktop and you select an avatar that doesn’t have a Quest version, and Quest users see your global fallback
For the second one, most people just settle for one of the public fallbacks that VRChat provides, as setting a fallback requires being able to upload your own avatar and doing a bunch of extra work to make it a fallback in the first place.
In the first case (Quest version of PC avatar), it’s important to keep your various expression parameters in sync, and a good idea to try to keep your physbone counts the same with the order in sync. If your expression parameters fall out of sync, weird things happen, like your clothing or material setup will be vastly different for PC vs. Quest users, and if your physbones fall out of sync, then goofy stuff happens like a Quest user will tug on your ear and PC users will see your tail move instead.
In the second case, it’s much less important for things to stay synchronized; when people see your global fallback, they aren’t seeing any of your expression stuff from the avatar that you’re wearing. The global fallback will be scaled to more or less be the same size as your current avatar, and it’ll track your visemes and position and so on, but parameterized things will not synchronize between the two. And that’s a good thing!
Anyway. When creating a global fallback avatar, PolyTool makes the process a lot easier. It has builtins for converting your avatar over to a Quest fallback, including mesh decimation and material atlassing and so on. It’s not a one-and-done thing and there’s a few fussy things to worry about. At some point I might make a full tutorial on how to use it for those purposes, although there’s a brief explanation about how I have it set up in my critter avatar documentation.
However, in general, I find that Polytool’s mesh decimator isn’t all that great, and I’ve had much better luck using Blender’s mesh decimation for producing the 15K and 10K polygon versions (for the Quest version and the global fallback, respectively). And this is also something the Cats Blender Plugin will theoretically help with.
On that note, a nice thing about how Unity’s FBX importer works is that you can do your avatar setup on your full-resolution mesh and then have the Quest versions inherit from the main mesh:


It’s a fairly small thing but it makes at least that thing slightly less obnoxious.
Facial gesture things
If you want to use gestures to control non-hand parts of your avatar, you need to add some gesture-control layers to your FX controller. I like to have my left hand control my eyes and my right hand control my mouth, with both totally independent from each other. To that end I have a LeftHand layer and a RightHand layer on my FX controller, and have added the GestureLeft and GestureRight parameters accordingly.
In addition to setting up gestures, you need to be aware of blink and viseme overrides. When a gesture animation is running, by default VRChat will continue to run its own state-based animations, such as blinks and visemes at the same time, and these animations are additive. So, for example, if you have a gesture which closes your eyes, and then VRChat makes you blink while this is running, your eyes will be “double-closed,” and similarly if you’re making a grin with your mouth and you speak, the mouth animation will stack on top of the grin animation — probably not what you want, and often the results can be quite bizarre!
So, to that end, it’s helpful to know how to do blink and viseme overrides.
Note that in general, VRCFury vastly simplifies the setup of gestures, and even allows you to have two-handed gestures, which is nice. Unfortunately, VRCFury’s gesture system does not currently support viseme overrides. If you only need blink overrides, VRCFury is a much better option overall. (I have also opened a feature request on VRCFury to support viseme overrides, so hopefully this whole section goes away someday!)
Blink overrides
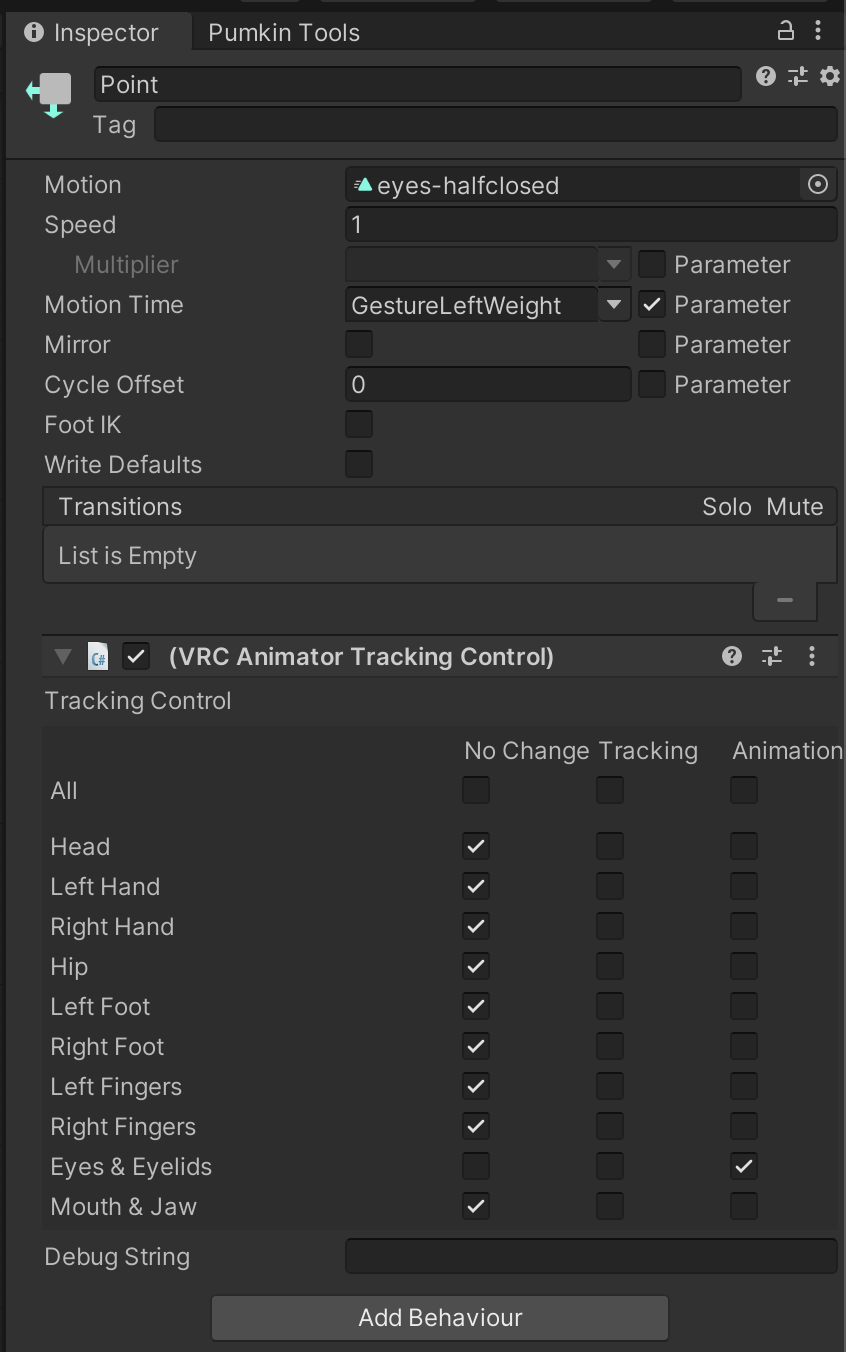
If you have a gesture which manipulates your eyelids, your automatic blink animations will be in addition to that, so if your gesture, for example, closes your eyes, your eyelids will periodically go even further down. Which looks very, very wrong. Fortunately, the fix to that is pretty straightforward; on your animator states, add a “VRC Animator Tracking Control” behaviour, and set Eyes & Eyelids to “Animation” for ones which you don’t want blinking to occur during, and “Tracking” for ones where you do (including the idle state).
For example, here’s how my left-hand “point” gesture (which half-closes my eyes) looks in the inspector:
Viseme overrides
In a similar way you can easily override the triggering of viseme animations from a gesture, but that’s normally not what you want to have happen; I want the viseme to override the gesture, instead. For example, if I have a viseme that opens my mouth (such as a slack-jawed or grinning expression) I want speech to override that, so that the mouth shape doesn’t mess up the viseme animation. To do that, you again edit your animation controller, namely adding “Viseme” as an animator parameter, and then on the animation layer, do the following:
- On the transitions from idle to gesture, add a condition for “Viseme Equals 0”
- On the gestures that have this set, add a transition back to idle with a condition of “Viseme NotEqual 0”
On my animation controller I like to outdent the nodes that require this stuff to make it easier to see which ones need this extra transition; in this example, “Peace” “Gun” and “Thumbs up” have viseme-incompatible gestures:


Useful libraries and Unity plugins
As I mentioned in my cross-platform material switching explanation, one of the most useful tools for managing VRChat avatars is VRCFury, which makes a lot of things a lot easier:
- Managing animation layers, especially on cross-platform avatars
- Adding attachment accessories with toggles
- Simplifying menu management
- and so much more
One of the things that VRCFury makes really easy is adding GoGo Loco, which gives you a whole bunch of useful stuff on your avatar:
- Various sit and lie poses (especially helpful if you don’t have full-body tracking)
- Avatar size adjustments (although VRChat are adding this as a native in-game function soon)
- Adding various flight options, including being able to carry other people while you fly
Thry’s avatar performance tools are really handy for keeping track of a bunch of stuff.
VRC Gesture Manager makes testing your avatar infinitely easier.
PumkinsAvatarTools are handy for a lot of initial setup and also correcting a bunch of common issues with your rig.
EasyQuestSwitch makes it easy to switch between Quest and PC builds, notably turning on and off different avatar instances depending on your current build target.
Efficiency
Watch this great talk by Tupper from VRChat about avatar optimization.
Stuff I try to do to keep things efficient in general:
- Instead of having multiple toggleable meshes and attachments on my avatar, keep as much as possible on a single mesh, using material slots to differentiate components, and blendshapes for showing/hiding/customizing parts
- Use VRCFury’s blendshape optimizer to cut down on VRAM usage
- Use shaders that support offline locking/optimization (such as Poiyomi and VF Goo)
Testing your avatar
The Avatar Testing Chamber world is an amazing spot for testing your avatar. It gives you a third-person view, flat 2D views, multiple lighting setups, AudioLink, MMD, and a DPS tester. I highly recommend it for iteration.
If you’re runing VRChat from the same computer that you are editing your avatar on, you can use the “Build & Test” button to store a local copy of the avatar, and then from VRChat you go to the “Other” section of your avatars to actually apply the SDK avatar. If you’re editing and running on separate machines, you can either do the slow upload-and-test-and-whatever process, or you can use remote build and test.
Random Q&A-type stuff
See also my material switching tutorial, which covers a lot of issues you might run into when uploading or with your uploaded avatar’s performance.
My avatar’s lighting gets weird sometimes (like turning dark when it shouldn’t)
The way that lighting works in VRChat takes a lot of shortcuts to keep performance up. Rather than lighting every pixel individually, Unity takes basically a lighting sample at the body’s “anchor” point and uses that to infer what the lighting will be across the entire body. (I am… extremely oversimplifying here.)
Anyway, Unity’s default selection of anchor point is kind of hard to predict and usually wrong. (I think the default anchor point is the bottom of your feet or something?) The fix for this is to go to your avatar’s descriptor and find the “anchor override” setting, and drag your desired sampling location from your armature. Your best bet is generally something in the middle of your body, like your spine or chest.
Note that no matter what your anchor point is, there’ll be situations where things seem a bit weird, usually at around the edges of the lighting regions (again, massively oversimplifying) in an environment. Some environments are properly set to blend their lighting regions between areas, others are not, and the way that lighting regions are set up is also a bit messy. If you notice consistent issues with lighting in a particular VRChat world, you could perhaps reach out to the world’s author to NICELY suggest that they adjust their light probes and reflection probes accordingly.
Also, VRCFury provides an Anchor Override Fix component that will automatically set the anchor override to the chest for your avatar and all of its attachments. If you’re using attachments, this is the preferred way to set things up, since that will ensure that your lighting is consistent across everything.
Lighting and reflections are inaccurate on Quest
Quest environments don’t support reflection probes. To get a reflection effect on Quest you need to use the “Matcap Lit” shader, which lets you provide your own matcap (aka spherical environment/reflection mapping) to the material. This is a very old but efficient technique that dates back to the dawn of texturemapped graphics. It first appeared in computer graphics in the early 80s, and was pretty common in realtime games by the mid-90s. Even the Nintendo 64 and original Playstation could do it!
Anyway, Poiyomi comes with a bunch of matcap textures, and there’s plenty of matcap libraries online as well; for example, Alex Rodin maintains a gigantic collection of them. And if that’s not enough, there’s a Unity plugin that makes it relatively easy to generate your own!
Note that one key component that VRChat’s matcap shader is missing is the ability to add a normal map, so there’s a lot of surface textures that it can’t actually do. But for anything relatively smooth it works pretty decently, given the limitations of the platform.
A bunch of avatar control stuff stopped working
Make sure you haven’t overridden your avatar’s main animator with one of your animation controllers (e.g. you were adding new animations for a customization option).
Things that commonly stop working when this has happened:
- Visemes when speaking
- AFK animations
- Crouching
- Locomotion
- Blinking
My rig isn’t behaving quite right
VRChat does some really weird stuff when it comes to conforming your avatar’s rig to its reference rig. It’s pretty helpful to try modeling based on the base rig that they provide in the SDK (under Packages/com.vrchat.avatars/Samples/Dynamics/Robot Avatar/). It seems like the way it tries to conform your avatar to its intuition of your real-life human skeleton is backwards, like if the shoulders are too far out, it moves them further out. Very weird, and unfortunately this stuff isn’t very well-documented.
Things get even more confusing if you want full-body tracking; the way it tries to reconcile the difference between your rig’s proportions and what it thinks your flesh being’s proportions are is a bit unpredictable and opaque.
The general guidance seems to be to start out either using a Rigify armature or to adapt the armature from the reference avatar from the SDK (currently in Packages/VRChat SDK - Avatars/Samples/Dynamics/Robot Avatar), or to borrow an armature from a pre-existing base that you know to work correctly. Unfortunately, this doesn’t help if you have a specific body shape and proportion that you’re targeting.
YouTube has a bunch of tutorials for trying to fix FBT issues. A lot of people recommend VRChat FBT Fixes, although it’s pretty outdated now and a lot of the fixes seem to be on the order of “trick VRChat into thinking you have a non-conforming skeleton.” I haven’t found a good guide for how exactly to proportion, rig, and weight-paint a mesh for best results. Every avatar base I’ve obtained seems to do things differently and I think it’s just a case of “throw stuff at the wall until it works.”
There is an immersive scaler plugin for Blender which purports to automatically fix your rig to conform to VRChat expectations, but I haven’t had much luck with it either.
It’d be nice if there were libraries of existing reference poses and image references for how, exactly, to weight paint the mesh, in particular.
Meanwhile, here’s a few things I’ve figured out over the years:
- Make sure that your FBX units were set correctly at export time
- Make sure not to conform your avatar skeleton to the Unity t-pose, as that seems to cause more problems than it solves
- Set your avatar sizing to “by height” and then modify the rig/mesh to get the arm span correct (which takes a lot of trial and error); this is much easier than trying to size things by “arm span.”
Setting up my eye tracking is super weird!
The bones for your eyes are supposed to point upwards, not forwards.
Yeah, it’s weird. They probably had a reason for that.
Wrapping up
Whoops this was meant to just be a bunch of links to things you could consult and not a bunch of tutorial/help guides on its own. Well, if you found it helpful anyway, please consider buying one of my avatars or supporting me on Ko-Fi all the same.